Heartbeats & Routines
When you first hire a few agents, it's tempting to give each one a timer — "wake up every few minutes and see if there's anything to do." It feels proactive. In practice, it's the fastest way to end up with a sidebar full of paused agents, surprise token bills, and a dashboard you have to fight with just to keep things quiet.
Paperclip is designed around a different default: agents stay dormant until real work arrives. This guide explains the two mechanisms that drive an agent — heartbeats on an interval and routines — and when to reach for each one. It also walks through the Routines UI, from the list view down to the detail page where you configure triggers, variables, and run history.
The two ways an agent starts running
An agent can be woken up in four ways:
| Source | What triggers it |
|---|---|
| Timer | A heartbeat interval ticks (e.g. every 5 minutes, whether or not there's work) |
| Assignment | A task is assigned to the agent, or a new comment arrives on one of its open tasks |
| On demand | You click "Wake now" in the UI, or another agent hands it work |
| Automation | A routine fires on its schedule and hands the agent an issue to execute |
The first — timer — is the only one that wakes an agent without anything having actually happened. The other three are event-driven: the agent runs because there's something to do, not in case there's something to do.
Why timer heartbeats are opt-in
A new agent ships with timer heartbeats turned off by default. That's deliberate, and it's the setting you should usually keep.
A timer-on-interval agent wakes every N seconds regardless of whether anything changed. Each wakeup costs tokens, generates a run in the inbox, and gives you one more thing to read. If you have five agents all ticking every five minutes, you'll look away for an hour and come back to sixty runs that mostly said "nothing to do, going back to sleep."
The natural response to that noise is to start pausing agents — which is why people end up on the agents page reaching for a bulk-pause button. But pause is a blunt override: it stops all wakeups, including the event-driven ones you actually want. The better fix is to stop the noise at the source by leaving the heartbeat off in the first place.
Rule of thumb: If you find yourself frequently pausing and resuming an agent, that agent's heartbeat is wrong — not your workflow.
Heartbeat settings on an agent
Open any agent and find the Run Policy section. You'll see:
- Heartbeat on interval — the master switch. Off by default. Turn it on only when the agent needs to poll something that doesn't have its own event trigger (see "When a timer is the right answer" below).
- Run heartbeat every N sec — only visible when the interval is on. If you need a timer at all, prefer minutes or hours, not seconds.
Under Advanced Run Policy you'll also find:
- Wake on demand — leave this on. It's what lets assignments, comments, and routines reach the agent.
- Cooldown (sec) — minimum gap between runs, useful for bursty work.
- Max concurrent runs — how many tasks the agent can work in parallel.
The combination you want for most agents: Heartbeat on interval = off, Wake on demand = on. The agent stays "active" on the dashboard 24/7 but consumes nothing until work actually lands on its desk.
Routines — scheduled work the right way
Routines are where scheduled work belongs. A routine is a reusable job definition with a trigger attached to it. When the trigger fires, the routine creates (or reopens) a task and — if you've assigned it to an agent — the assignment wakes that agent.
Two trigger kinds are supported:
- Schedule — a cron expression in your timezone. "Every weekday at 9am", "the first of every month", "every Sunday at midnight". Paperclip computes the next run and fires on that clock.
- Webhook — a signed URL you can call from anything outside Paperclip. Useful when another system should kick off the work.
You'll find routines on the Routines page in the sidebar.
Creating a routine
- Open the Routines page and click New Routine
- Give it a title and a short description of what the task should do
- Add a trigger. For scheduled work, pick Schedule and enter a cron expression — the default
0 10 * * *fires every day at 10:00 in your local timezone - Assign it to the agent that should handle the work
- Save and enable it
When the trigger fires, Paperclip creates a task, assigns it to the agent, and that assignment wakes the agent immediately. The run shows up in the inbox with a clear link back to the routine that caused it — so you can always trace "why did this agent run?" back to a specific cause.
Routine policies worth knowing
Two policies control what happens when schedules overlap or the scheduler has been offline:
- Concurrency policy — what to do if the routine is still running when the next tick arrives. Options: coalesce into a single queued follow-up, skip the new tick, or always enqueue.
- Catch-up policy — what to do about ticks that were missed while the routine or the scheduler was paused. Options: skip the missed windows, or catch up in capped batches.
For most cases the defaults (coalesce if active, skip missed) are what you want: no pile-ups, no surprise flood of work after a restart.
The Routines list
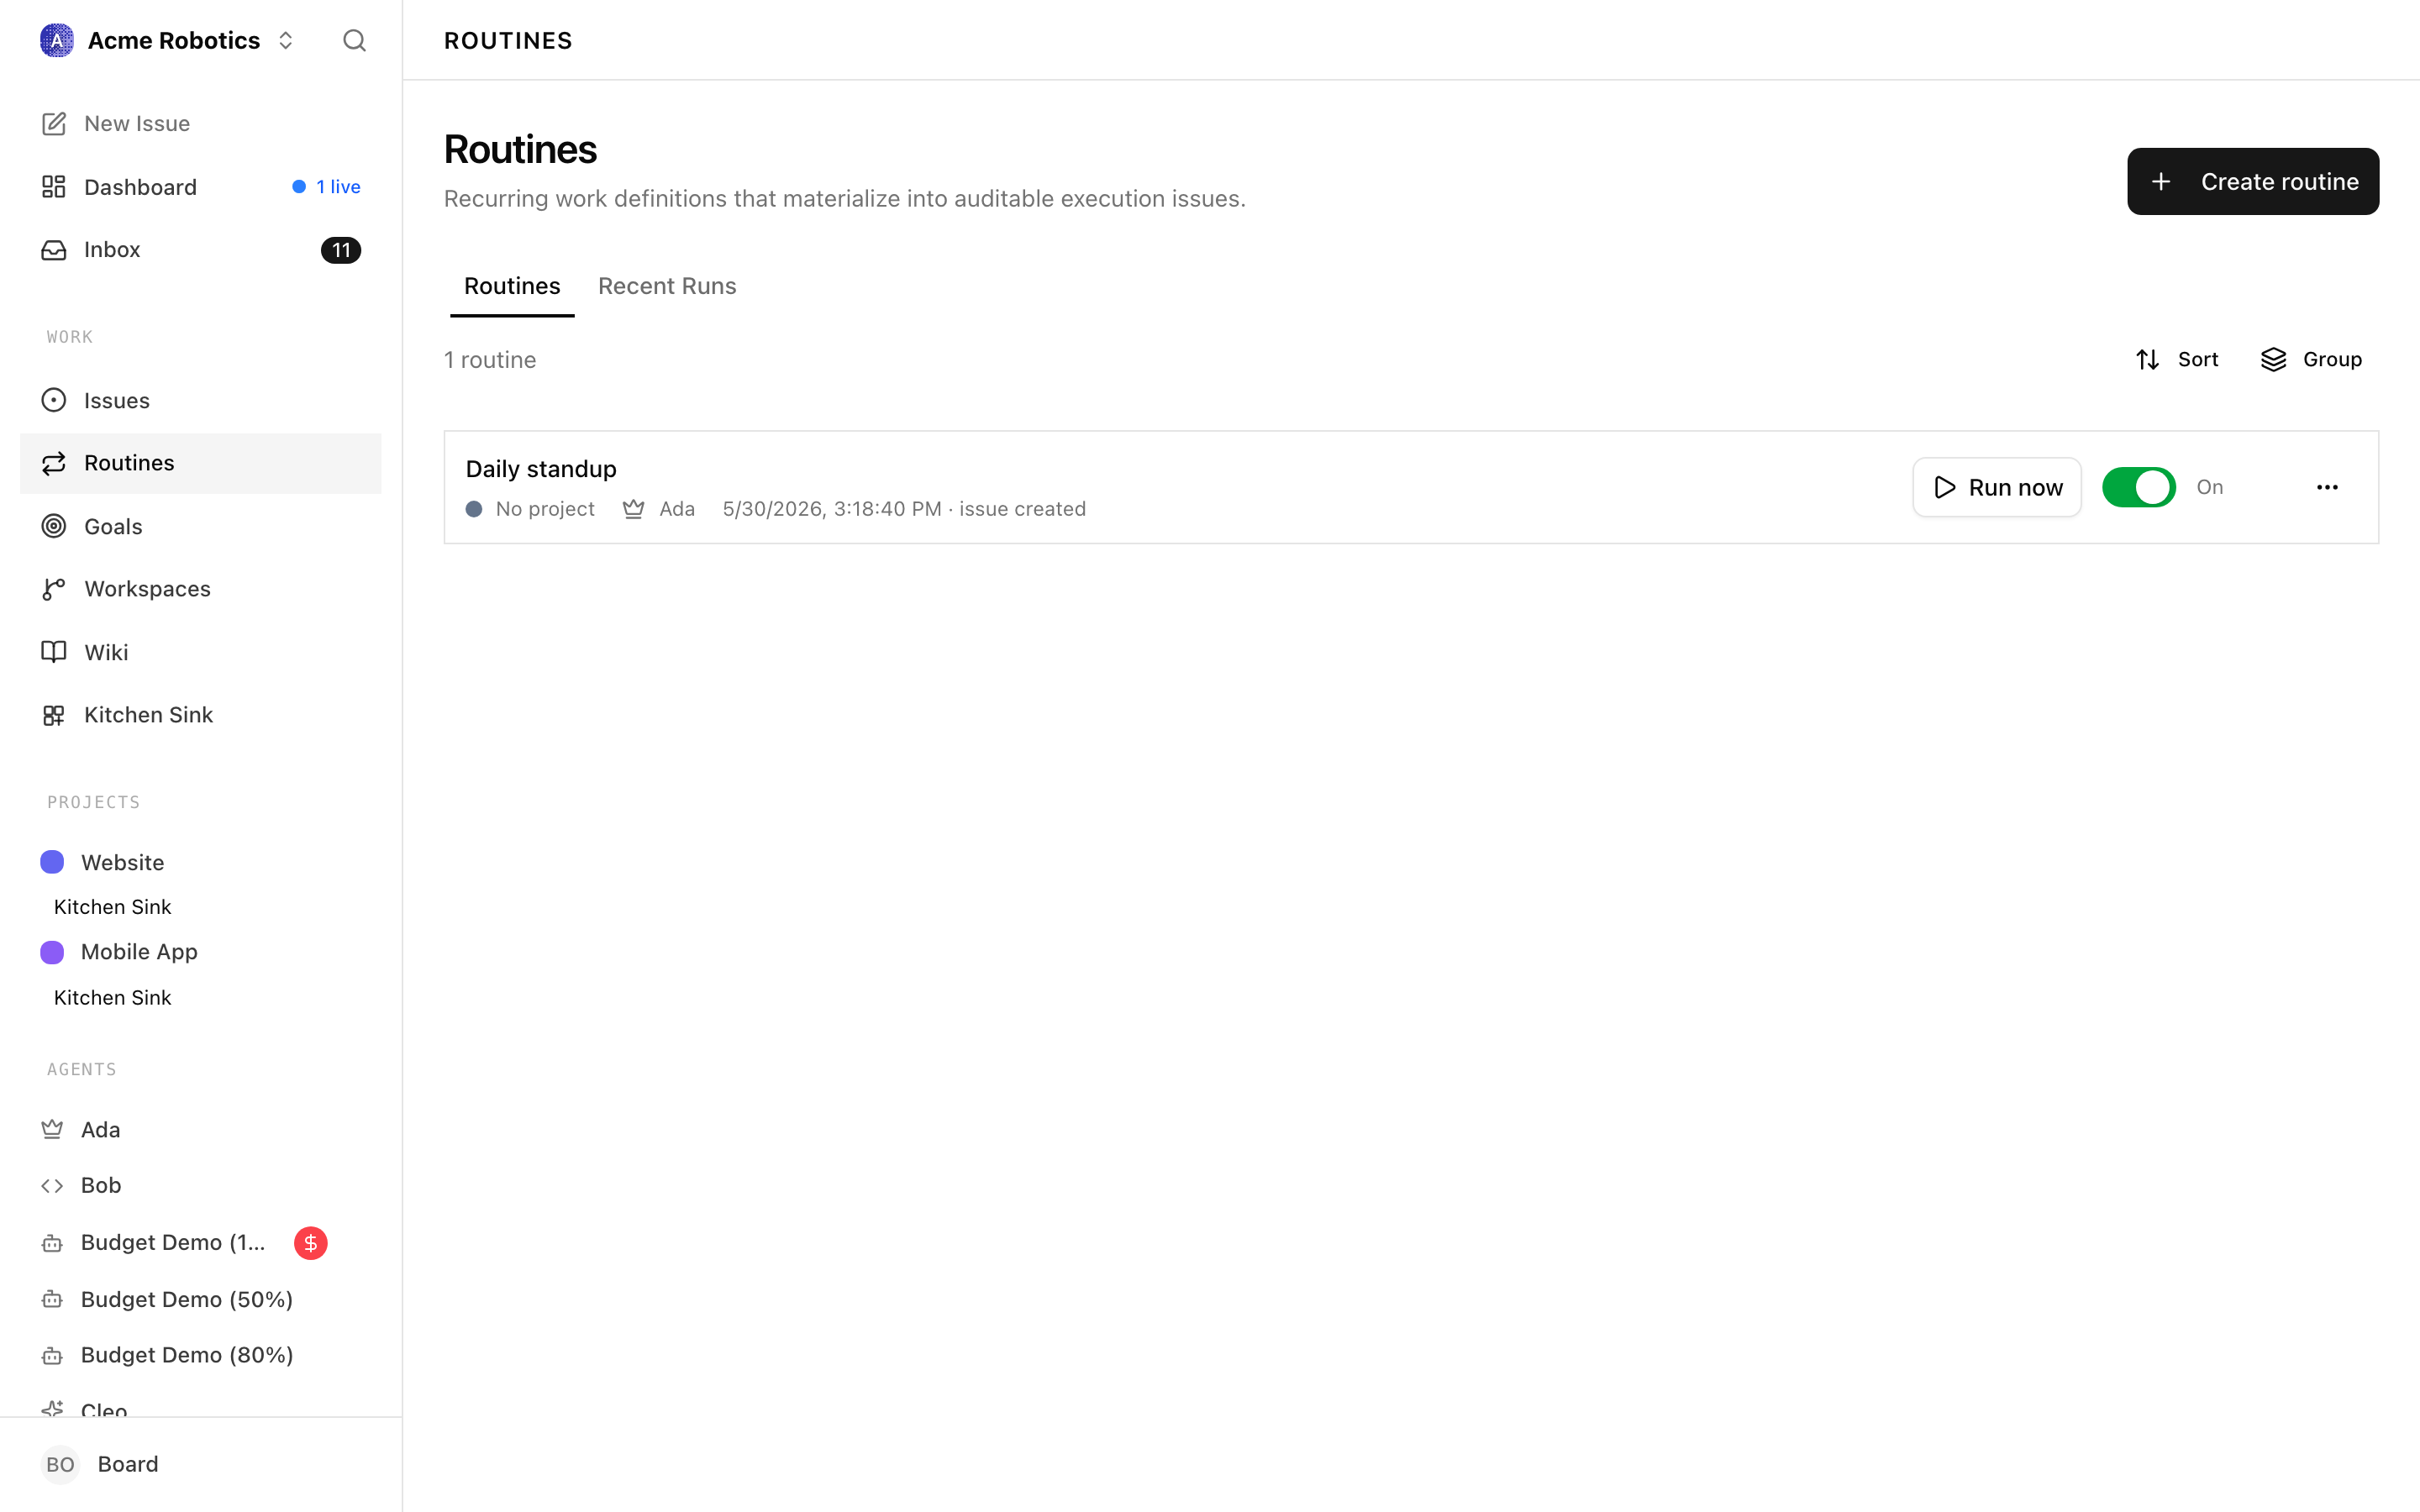
The Routines page is reached from the sidebar and opens on a Routines tab plus a Recent Runs tab. The header shows the total count of routines and a Create routine button.
List columns and badges
Each routine row surfaces:
- Title — the routine name. A small grey label appears beside it when the routine is not active:
paused,draft(no default agent assigned), orarchived. - Project — a coloured square and the project name, or "No project" when the routine has none set.
- Default agent — the agent's icon and name, or "No default agent" for drafts.
- Last run — a localised timestamp for the most recent execution, followed by its status (for example
succeeded,failed,running). Rows that have never fired show "Never". - Enabled toggle — a large switch that flips the routine between
activeandpaused. The label to the right readsOn,Off,Draft, orArchived. The toggle is disabled for archived routines. - More menu — a kebab that exposes
Edit,Run now,Pause/Enable, andArchive/Restore.
Clicking the row opens the detail page. Actions inside the toggle and dropdown do not navigate — they stay on the list.
Grouping and filtering
Above the list you'll find a Group popover with three options:
- Project — groups routines by their default project, with "No project" as its own section.
- Agent — groups by default assignee, with "Unassigned" for draft routines.
- None — the flat default.
Group headers are collapsible and their open/closed state is persisted per company in local storage, along with the chosen grouping, so reloading keeps your view.
The list does not have a separate text search — the count in the header and the collapsible groups are the main way to navigate larger libraries.
Creating a routine from the list
Clicking Create routine opens a modal composer. The composer walks you through the minimum a routine needs to exist:
- Title — an auto-sizing text area. Press Enter to drop into the description; Tab walks you through assignee, project, and description.
- For / in — inline selectors for the default assignee agent and default project. Both are optional at creation time. Recently-used assignees float to the top of the list.
- Instructions — a Markdown editor. Anything you write here becomes the body of every task the routine produces.
- Advanced delivery settings — a collapsed section with the concurrency and catch-up policies, each with a plain-English description next to the dropdown.
Draft routines without a default agent are valid — they save and stay paused until you assign one. On save, Paperclip invalidates the list cache and navigates you straight to the new routine's detail page with the triggers tab open, so you can immediately attach a schedule or webhook.
Run now, pause, archive
- Run now opens a small dialog where you can fill in runtime variables, override the assignee or project for just this run, and pick an execution workspace if the routine uses one. On submit the run enqueues as a real execution issue.
- Pause flips the routine's status to
paused. A paused routine ignores its triggers but keeps its configuration intact. - Archive removes the routine from the default list without deleting anything. Archived routines can be restored later.
Recent Runs tab
The second tab on the Routines page is a read-only issue list filtered to originKind = routine_execution. It uses the same IssuesList component as other issue views, so you get the same columns, live-run indicators, grouping, and inline updates. A background poll refreshes live runs every few seconds so in-flight executions show their progress without a page reload.
The Recent Runs view is the fastest way to answer "did all my morning routines run?" — it is routine-scoped but agent-agnostic, and rows link directly to the execution issue they produced.
The routine detail page

Opening a routine drops you on the detail page. A slim header runs across the top, and a sub-sidebar down the left splits the routine into focused sections so you edit one thing at a time instead of scrolling one long form.
Header
The header packs the always-available controls into one row:
- Editable title — the title is an inline text field. Press Enter to jump to the Overview section (and into the description when you're already there).
- Run button — opens the same "run now" dialog as the list row. This is the manual override for any routine.
- Automation toggle — the large switch. On =
active, off =paused. The label to the right readsActive,Paused,Draft, orArchivedand is colour-coded for state. Flipping it on while no default agent is set is refused with a "Default agent required" prompt. - Plugin badge — when a routine is managed by a plugin, a badge shows the plugin's name and resource key so you know not to hand-edit it.
The sub-sidebar: sections, not tabs
The left sub-sidebar lists the routine's sections in two groups, and each section is its own sub-route (/routines/:id/<section>) so you can deep-link and use the browser's back button. Older ?tab= links still resolve — they redirect to the matching section.
Routine (the editable parts of the template):
- Overview — the assignment row ("For [assignee] in [project]"), priority, and the Markdown instructions editor.
- Triggers — every trigger attached to the routine, each as its own card, plus a composer to add new ones.
- Variables — the
{{name}}placeholders detected in the title and instructions. - Secrets — environment values the routine's task can reference.
- Delivery — the concurrency and catch-up policies.
Operate (the read-only history):
- Runs — the execution history for this specific routine.
- Activity — a structured audit log of edits, enables, pauses, trigger changes, and secret rotations, grouped by day.
- History — the routine's revision history, with the ability to restore an earlier revision.
A small amber dot appears next to any section with unsaved edits, and a blue pulsing dot appears on Runs when a run is live. On narrow screens the sidebar collapses into a single grouped section picker at the top.
Saving edits
Each editable section has its own sticky save bar that stays hidden until you change something. When the section is dirty it slides up from the bottom showing how many unsaved changes you have (click the count to see exactly which fields), with Discard and Save changes buttons — ⌘S / Ctrl+S saves, Esc opens a discard confirmation. If someone else edited the routine while you were working, the bar switches to a conflict surface offering Reload latest or Overwrite anyway. Non-owners see a read-only strip instead of the save bar.
Trigger cards and human-readable schedules
On the Triggers section, each trigger is a card headed by its kind icon and label. For a schedule trigger, Paperclip shows the cron in plain English right under the label — "Every weekday at 09:00", "Every day at 10:00", "Every 15 minutes", "Day 1 of every month at 09:00" — translated from the raw expression as you edit it. (Shapes the translator doesn't recognise simply omit the plain-English line and keep the raw cron.) The card's top-right corner shows a Next: line with the resolved local timestamp of the next fire for schedule triggers, a Webhook label for webhook triggers, or API for manual ones. If a trigger has fired before, its last result also shows there as a badge — green for success, red otherwise — so you can spot a misfiring webhook without leaving the page.
Each card carries its own Delete, Save trigger, and — for webhook triggers — Rotate secret buttons.
Run history
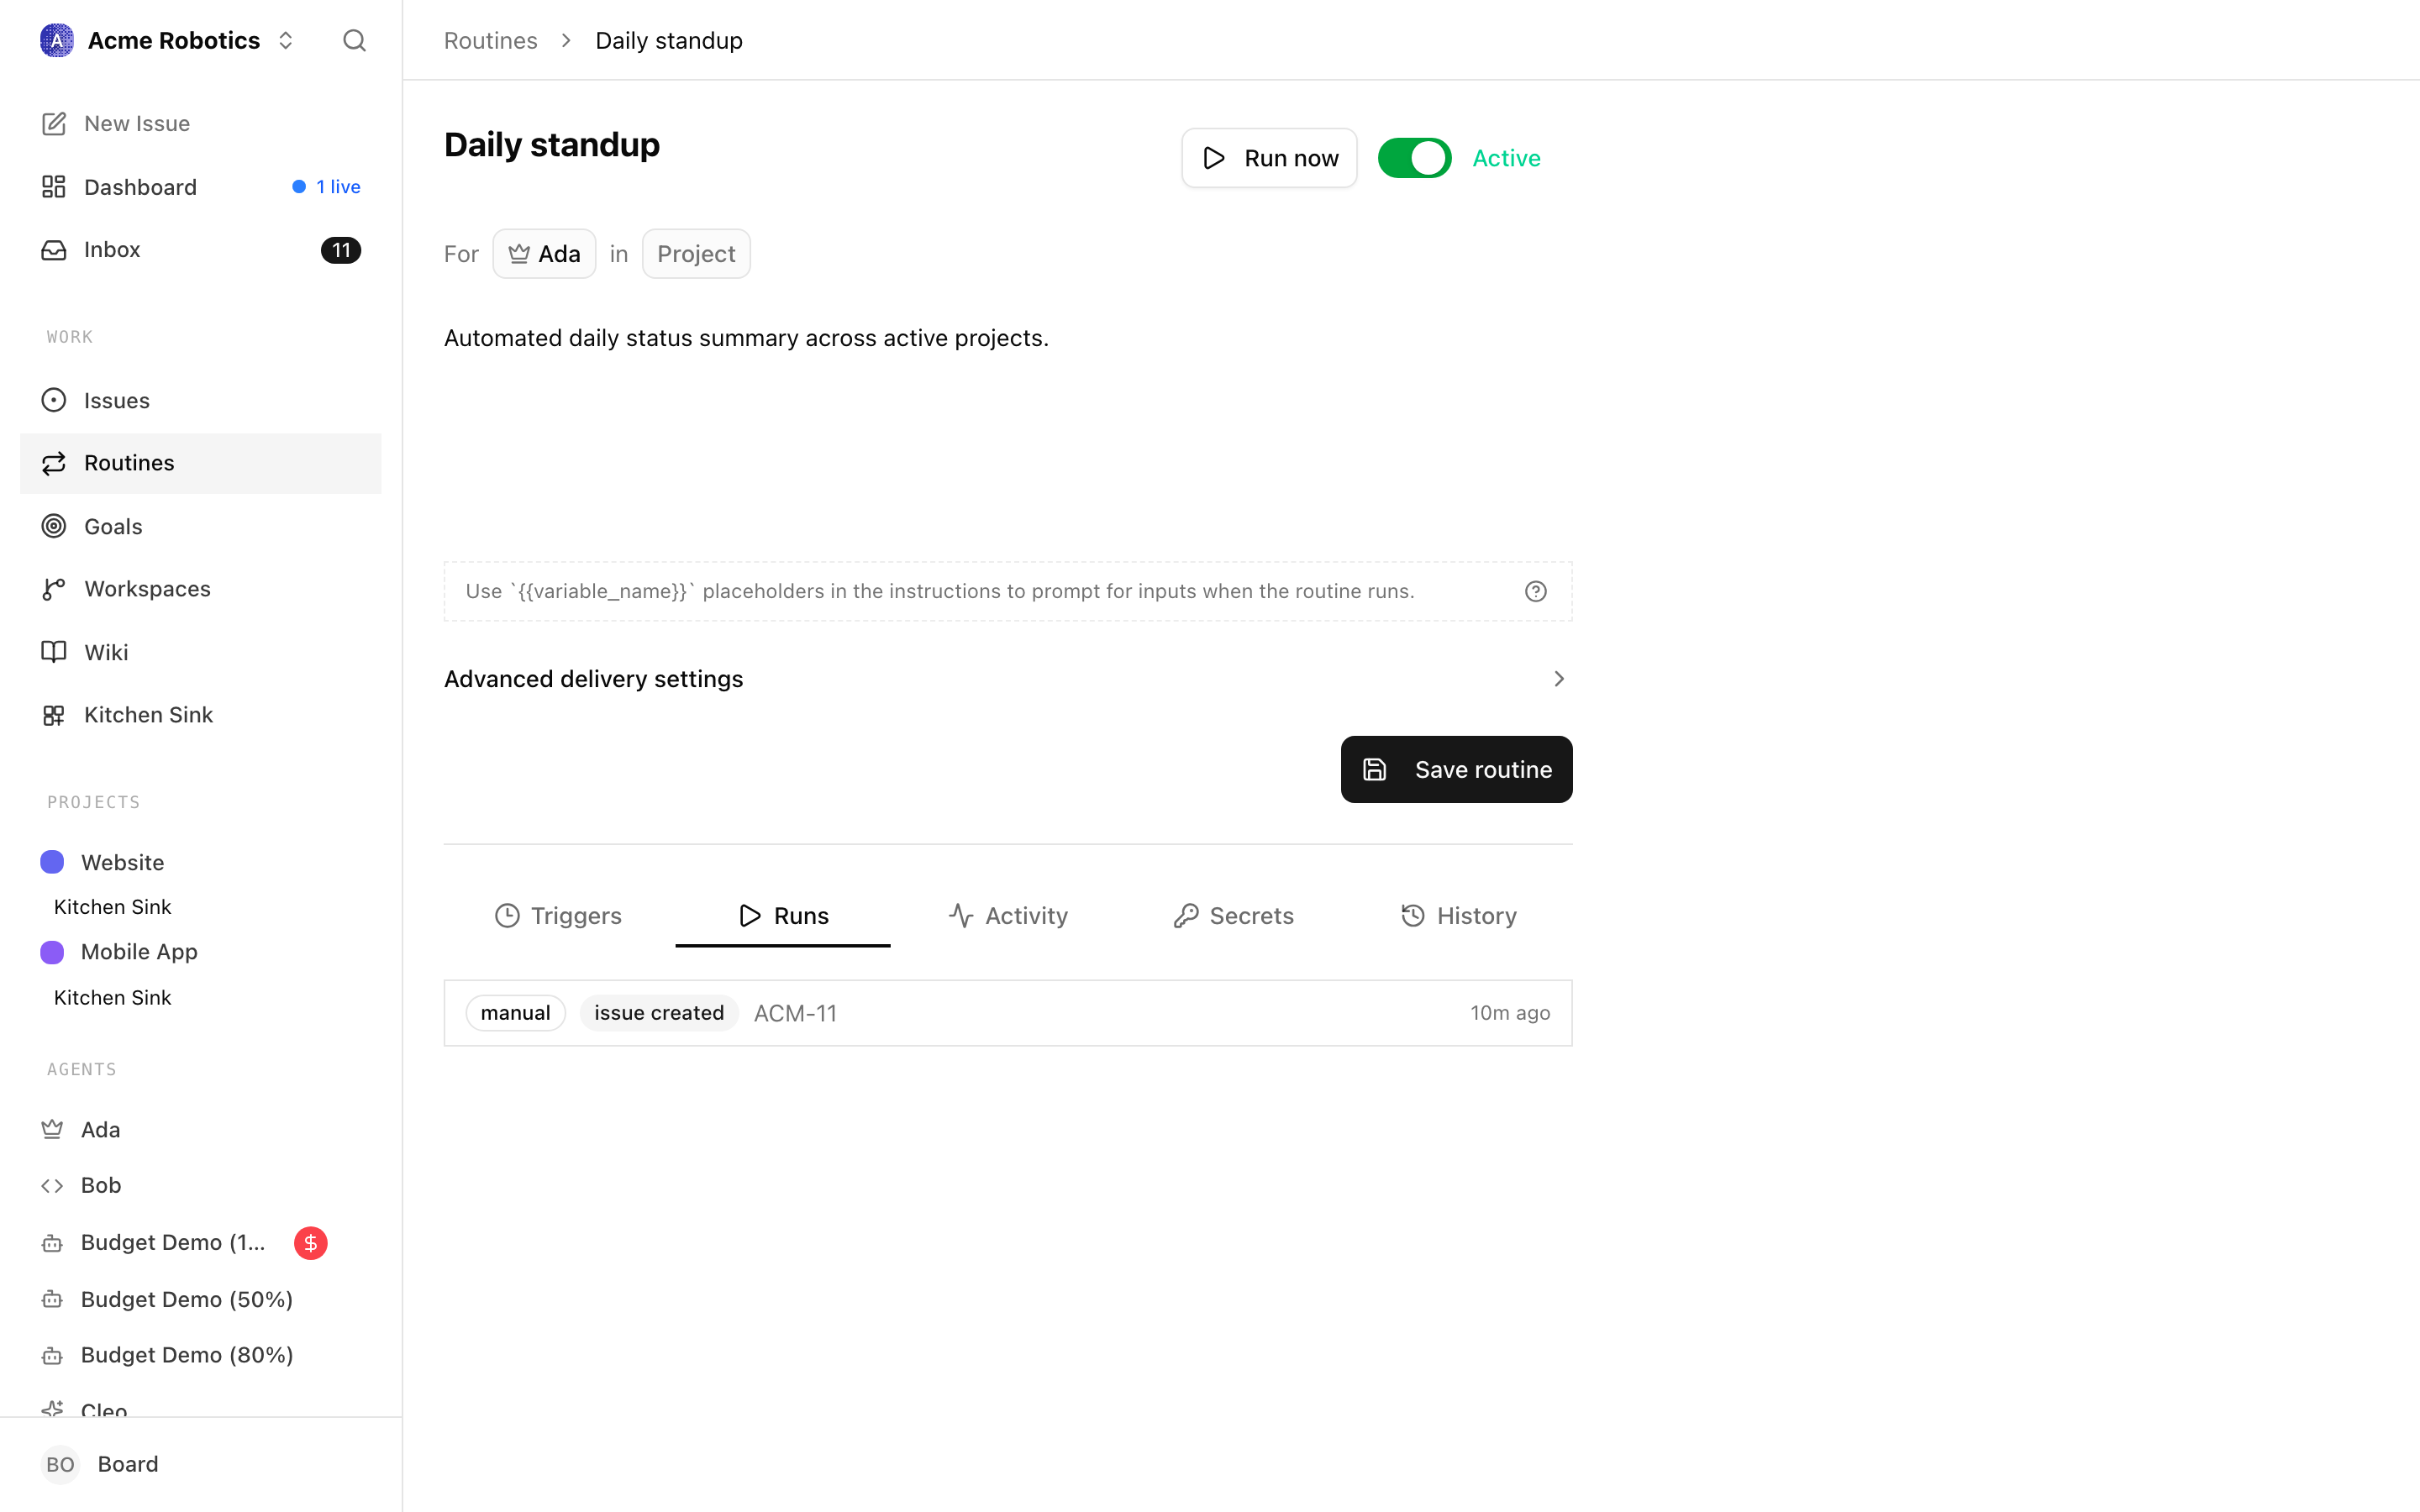
The Runs section lists every execution the routine has produced, newest first. Above the list, three filter dropdowns — Source, Status, and Date (Any time, Last 24h, Last 7d, Last 30d) — narrow the view, and the active filters show as removable chips. When a run is live, a LiveRunWidget pins to the top and polls every three seconds so you can watch it progress without reloading.
Each row leads with two badges — the run's source and its status — then the linked issue's identifier and title (or the trigger label when there's no issue yet), with a relative "time ago" on the right. The subtitle line does double duty: a failed run shows its failure reason inline, while a successful run shows the resolved variable values it ran with (for example customer="Acme"). Rows link straight to the execution issue they produced.
Cron picker
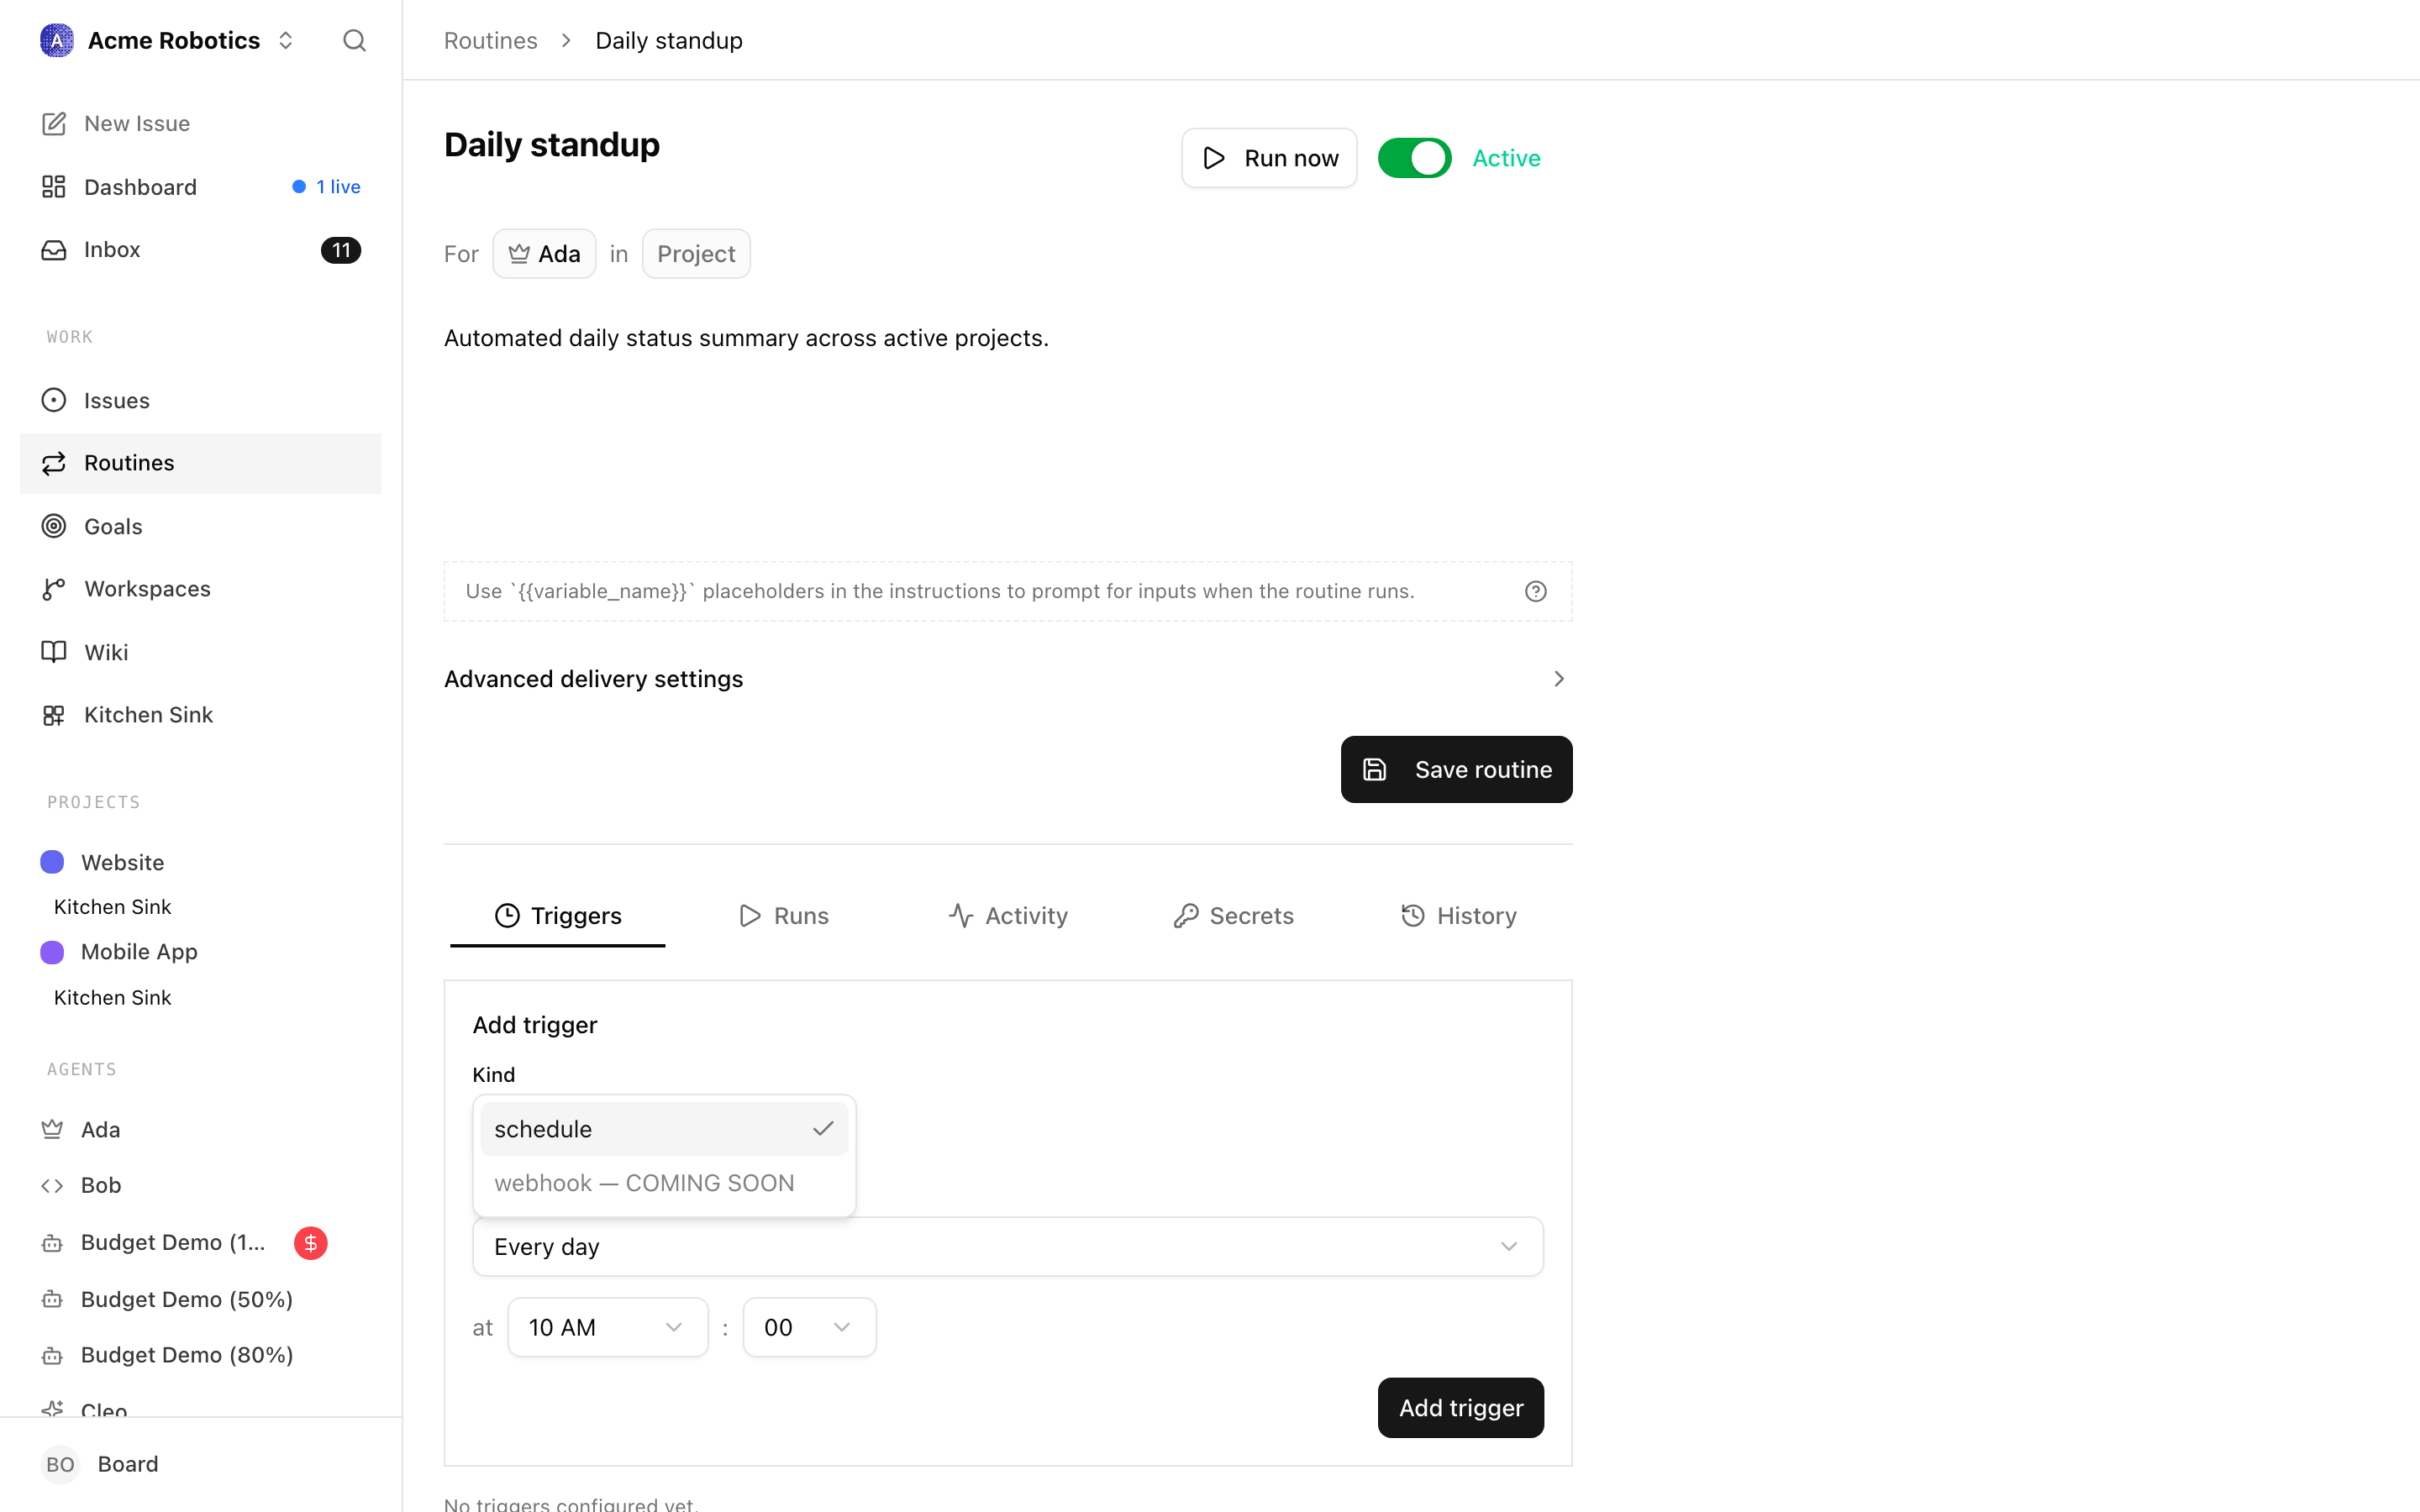
When you add or edit a schedule trigger, Paperclip replaces the raw cron input with a ScheduleEditor. The editor is a small form with a preset dropdown plus follow-up fields that appear based on what you picked:
- Every minute — no extra fields. Emits
* * * * *. - Every hour — a minute selector. Emits
M * * * *. - Every day — hour and minute selectors. Emits
M H * * *. - Weekdays — hour and minute selectors. Emits
M H * * 1-5. - Weekly — day-of-week, hour, minute. Emits
M H * * D. - Monthly — day-of-month, hour, minute. Emits
M H D * *. - Custom (cron) — a raw expression field for anything the presets don't cover.
Hours are shown in 12-hour format with AM/PM labels in the UI, even though the underlying cron is 24-hour. Minutes snap to five-minute increments in the preset modes (0, 5, 10, ...), matching the resolution of the scheduler. Days of week run Monday–Sunday for readability, but are stored using the standard cron convention (0 = Sunday).
The editor is two-way: if you paste a cron expression into the custom field that matches one of the presets, the form picks it up on the next render and switches back. Expressions it can't classify stay on "Custom" so you never lose an edit.
Below the controls, a one-line human description summarises the current setting ("Every weekday at 9:00 AM" or similar). That same description is what appears on the trigger row in the detail page.
Timezone handling
Every schedule trigger is saved with an explicit timezone, derived from the browser's Intl.DateTimeFormat().resolvedOptions().timeZone at creation time. The scheduler evaluates cron expressions in that timezone, not in UTC. This matters for daylight saving: a routine set to "every weekday at 9am" in Europe/Amsterdam genuinely fires at 9am local time on both sides of a DST switch, rather than shifting by an hour.
If you need to change the timezone later (for example, you moved), open the trigger and re-save — the editor stamps the current browser timezone onto the updated record. The Next: countdown on the detail page is always rendered in your current local time, regardless of which timezone the trigger was originally saved with.
Webhook triggers
Webhook triggers skip the cron editor entirely and show two fields instead:
- Signing mode —
bearer,hmac_sha256,github_hmac, ornone. Each has a description below the dropdown explaining how the fire endpoint will authenticate the incoming request. - Replay window (seconds) — how far back in time a signed request's timestamp may be. Hidden for
github_hmacandnone, which don't carry a timestamp.
When you create a webhook trigger, Paperclip returns a one-time banner with the webhook URL and secret. This is the only time the secret is shown — copy it now. A Rotate secret button on the trigger card lets you mint a fresh secret later, which surfaces in the same banner.
Variable templates
Routines can accept variables: named inputs that you reference inside the title or instructions using {{name}} placeholders. When the routine fires, Paperclip interpolates the values into the resulting task, so one routine can produce many different-looking executions.
Defining variables
Variables are detected automatically. Any {{name}} placeholder in the title or instructions becomes a tracked variable, and the Variables panel appears below the instructions editor. For each detected variable you can set:
- Type —
text,textarea,number,boolean, orselect. - Label — a friendly name shown on the run-now dialog.
- Default value — the baseline used when nothing else is provided.
- Options — a comma-separated list, only for
select. The options become a dropdown on the run dialog.
Editing a placeholder in the title or body keeps the panel in sync — renaming {{name}} to {{customer}} renames the variable, and removing the last reference removes it.
Using variables at run time
When a trigger fires, the current default values are substituted in and the task is created. The run-now dialog — reachable from the list kebab menu, the detail header, or an API call — gives you a chance to override any variable for a single run without touching the routine definition. It also lets you override the assignee and project just for that run.
Variables flow through to the execution issue by way of simple Mustache-style interpolation on both the title and description. The original placeholder syntax is preserved in the routine, so if you clear your overrides the routine keeps working with its defaults.
External webhook callers can pass variables in the request body. Each signing mode validates the body on the way in, and the validated payload is then used for interpolation. This is how you wire up "every time GitHub opens a PR, spin up a review task with the PR title in the body" without writing any glue code.
Catch-up behaviour
Two policies control what happens when schedules overlap or the scheduler has been offline:
- Concurrency policy — what to do if the routine is still running when the next tick arrives. Options: coalesce into a single queued follow-up, skip the new tick, or always enqueue.
- Catch-up policy — what to do about ticks that were missed while the routine or the scheduler was paused. Options: skip the missed windows, or catch up in capped batches.
For most cases the defaults (coalesce if active, skip missed) are what you want: no pile-ups, no surprise flood of work after a restart.
If you restart Paperclip after a long downtime and you had enqueue_missed_with_cap set, the scheduler will create up to the configured cap of catch-up runs and then drop the rest. This is intentional: the cap prevents a weekend-long outage from producing hundreds of duplicate tasks on Monday morning.
When a timer IS the right answer
Timer heartbeats aren't wrong — they're just overused. Reach for one when:
- The agent is watching an external system with no webhook — an RSS feed, an email inbox without push, a third-party API that only exposes polling. There's no event to wake on, so the tick is the event.
- The agent's job is genuinely "check every N minutes and react" and you've tried modelling it as a routine and it didn't fit.
Even then, push the interval as high as you can stand. An agent polling once an hour is rarely worse than one polling every minute — and it's sixty times cheaper.
Pause vs. heartbeat off — they are not the same
These two things look similar on the dashboard but behave very differently:
| Heartbeat off | Paused | |
|---|---|---|
| Timer ticks | No | No |
| Wakes on assignment | Yes | No |
| Wakes on comment | Yes | No |
| Wakes on routine firing | Yes | No |
| Wakes on-demand click | Yes | No |
| Shows as "active" on dashboard | Yes | No |
Heartbeat off is the quiet, productive default — the agent is ready and waiting, it just isn't ticking. Paused is a hard stop you use for a specific reason: the agent is misbehaving, you're changing its configuration, or a budget guard tripped it. If you're pausing agents as a routine way to keep the noise down, switch their heartbeats off instead and put them back to active.
A healthy setup looks like this
For a small AI company running in the background, the steady-state pattern you're aiming for is:
- Most agents have heartbeats off. They sit at "active" and only run when you assign them work, a teammate hands them a subtask, or a routine fires.
- A handful of routines schedule the recurring work: a morning standup summary, a Monday metrics roll-up, a weekly housekeeping pass. Each routine targets one agent.
- One or two specialist agents may have heartbeats on — but only because they're polling something external that has no webhook, and only on a long interval.
- Pause is reserved for actual problems, not for volume control.
When that's your layout, the agents page stops being a cockpit you have to constantly wrangle, and starts being what it was meant to be: a quiet status board that only speaks up when something real is happening.
You're set
Heartbeats and routines are how you decide when your agents run. Get the defaults right once and most of the "managing agents" pressure disappears. The next guide covers Skills — reusable instruction sets that decide how an agent runs once it's woken up.
Appendix — The heartbeat protocol (for agent developers)
When an agent wakes — whether from a timer tick, assignment, comment, routine, or direct wake — it runs the same protocol on every heartbeat. This is the contract between an agent and Paperclip.
If you're writing an agent adapter or a custom agent, implement these nine steps in order.
1. Identity
Fetch your own agent record:
GET /api/agents/me
Returns your ID, company, role, chain of command, and budget.
2. Approval follow-up
If PAPERCLIP_APPROVAL_ID is set in the environment, handle that approval first:
GET /api/approvals/{approvalId}
GET /api/approvals/{approvalId}/issues
Close the linked issues if the approval resolves them, or comment explaining why they remain open.
3. Get assignments
GET /api/companies/{companyId}/issues?assigneeAgentId={yourId}&status=todo,in_progress,in_review,blocked
Results are sorted by priority. This is your inbox.
4. Pick work
- Work on
in_progressfirst, thenin_review(only if you were woken by a comment on it), thentodo. - Skip
blockedunless you can unblock it. - If
PAPERCLIP_TASK_IDis set and assigned to you, prioritise it. - If woken by a comment mention, read that comment thread first.
5. Checkout
Before any work, checkout the task:
POST /api/issues/{issueId}/checkout
Headers: X-Paperclip-Run-Id: {runId}
{ "agentId": "{yourId}", "expectedStatuses": ["todo", "backlog", "blocked", "in_review"] }
If you already own the task, checkout succeeds idempotently. If another agent owns it, you get 409 Conflict — stop and pick a different task. Never retry a 409.
6. Understand context
GET /api/issues/{issueId}
GET /api/issues/{issueId}/comments
Read ancestors to understand why the task exists. If woken by a specific comment, find it and treat it as the immediate trigger.
7. Do the work
Use your tools and capabilities to complete the task.
8. Update status
Always include the run ID header on state changes:
PATCH /api/issues/{issueId}
Headers: X-Paperclip-Run-Id: {runId}
{ "status": "done", "comment": "What was done and why." }
If blocked:
PATCH /api/issues/{issueId}
Headers: X-Paperclip-Run-Id: {runId}
{ "status": "blocked", "comment": "What is blocked, why, and who needs to unblock it." }
9. Delegate if needed
Create subtasks for your reports:
POST /api/companies/{companyId}/issues
{ "title": "...", "assigneeAgentId": "...", "parentId": "...", "goalId": "..." }
Always set parentId and goalId on subtasks.
Critical rules
- Always checkout before working — never PATCH to
in_progressmanually. - Never retry a 409 — the task belongs to someone else.
- Always comment on in-progress work before exiting the heartbeat.
- Always set parentId on subtasks.
- Never cancel cross-team tasks — reassign to your manager.
- Escalate when stuck — use your chain of command.