Settings
Paperclip has two settings surfaces, and it matters which one you're looking at.
Profile is your account — your display name and the avatar that shows up next to your comments. Changing it only affects how you appear. Other board users on the same instance have their own profiles and see their own.
Instance Settings is the admin surface. Anything you change there applies to the whole Paperclip instance — every company, every user, every agent that runs against this install. If you're running Paperclip on a VPS that hosts five companies, a toggle on the Instance page flips for all five.
This guide walks through both, section by section.
Profile

Open the Profile page from the account menu in the sidebar. It's scoped to you — nobody else's profile changes when you edit yours.
You get three things to work with:
- Avatar — click the round image (or the Upload photo button) to pick a new image from disk. It's uploaded into Paperclip's file storage under the currently selected company's asset space. If no company is selected you can't upload — the page will tell you to select one first. Once an image is set, a Remove button appears next to the upload control.
- Display name — the name shown in the sidebar account footer and as the author on any comments you post. It falls back to "Board" if left blank. The field is capped at 120 characters.
- Email — read-only. Your email is managed by the auth session (the login provider), not by this page. If you need to change it, update it wherever you signed in from.
Click Save profile to persist name or avatar changes. The button is disabled while the name is empty or a save is in flight.
Note: The avatar is stored as an asset under the selected company, but the profile itself is a user-level record. If you switch which company is selected in the sidebar later, your avatar keeps working — it's just that new uploads go to whichever company is active when you upload.
Instance: General
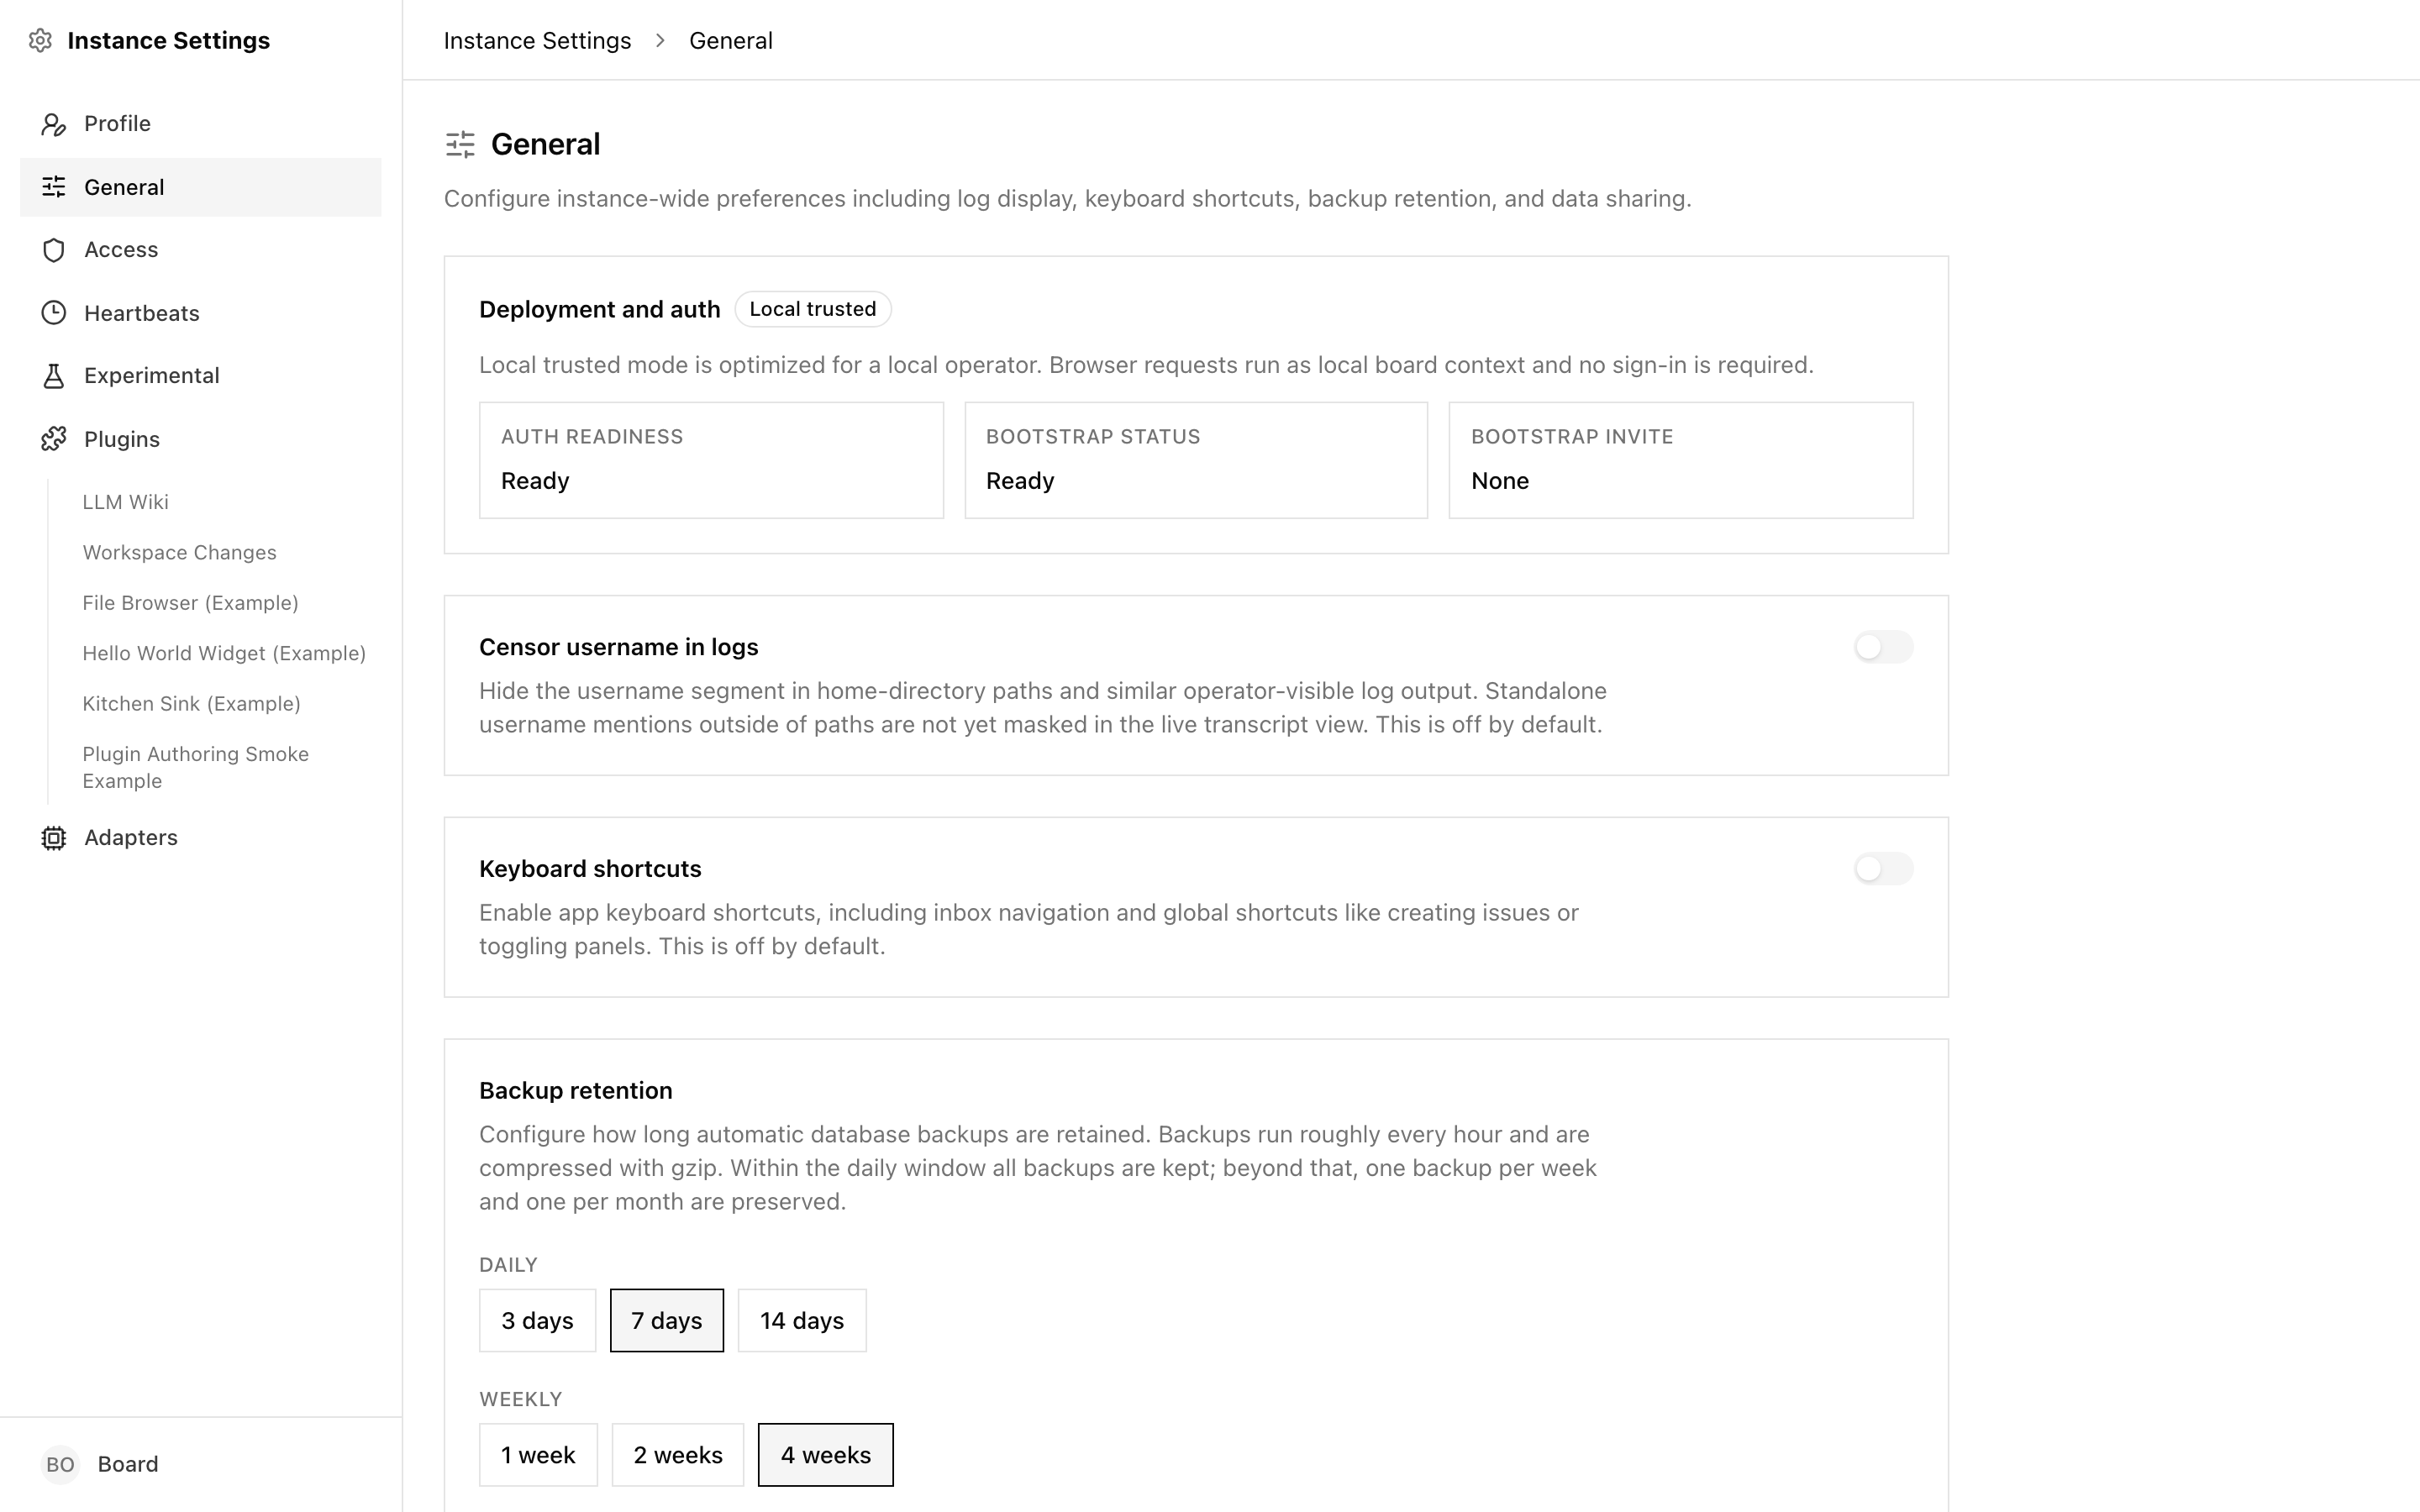
This is the top of Instance Settings. It's where you see how the instance was deployed and flip a few cross-cutting toggles.
Deployment and auth
At the top of the page, a small mode badge tells you which deployment profile this instance is running under. The text underneath explains what that means in practice:
- Local trusted — the instance is treating browser requests as a local board operator. No sign-in is required. This is the default when you run Paperclip on your own machine.
- Authenticated public — sign-in is required and the instance is intended to sit on a public URL.
- Authenticated private — sign-in is required, but the instance is intended for a private network (LAN, VPN, or similar).
Three status boxes summarize readiness:
- Auth readiness — whether the auth subsystem is fully configured.
- Bootstrap status — "Setup required" if the initial CEO/board setup hasn't completed yet, otherwise "Ready".
- Bootstrap invite — whether an active first-run invite link is outstanding.
These fields are informational. To change them you change the deployment itself — see Environment Variables.
Censor username in logs
Hides the username segment inside home-directory paths and similar operator-visible log output. Useful if you're sharing screen recordings or pasting transcripts. Off by default. Note that bare username mentions outside of path strings are not masked in the live transcript view — this is a best-effort filter, not a guarantee.
Keyboard shortcuts
Enables the app's keyboard shortcuts — inbox navigation, creating issues, toggling panels, and so on. Off by default because they conflict with browser or screen-reader shortcuts for some users. Turn it on if you want faster navigation.
Backup retention
Controls how long automatic database backups are kept at each tier. Paperclip takes daily backups and then thins them out over time:
- Daily — full daily backups kept for the selected number of days.
- Weekly — one backup per week kept for the selected number of weeks.
- Monthly — one backup per month kept for the selected number of months.
Each tier is a preset picker, so you can only choose from vetted retention windows. Backups are gzipped on disk. Longer retention means more storage — raise the windows only as far as your disk and compliance story require.
AI feedback sharing
Controls whether thumbs-up / thumbs-down votes on AI output can send the voted output to Paperclip Labs. Three states exist:
- Prompt (default) — no choice has been made yet. The next time you vote, Paperclip will ask once and save your answer.
- Always allow — voted AI outputs are shared automatically.
- Don't allow — voted AI outputs stay local.
The local vote is always saved regardless — this setting only controls whether the content leaves your instance. There's a link to the terms of service on the same card.
Sign out
A plain Sign out button at the bottom. It ends your session and sends you back to the login page. On a local-trusted instance there's usually nothing to sign out of, but the button is always present.
Instance: Access
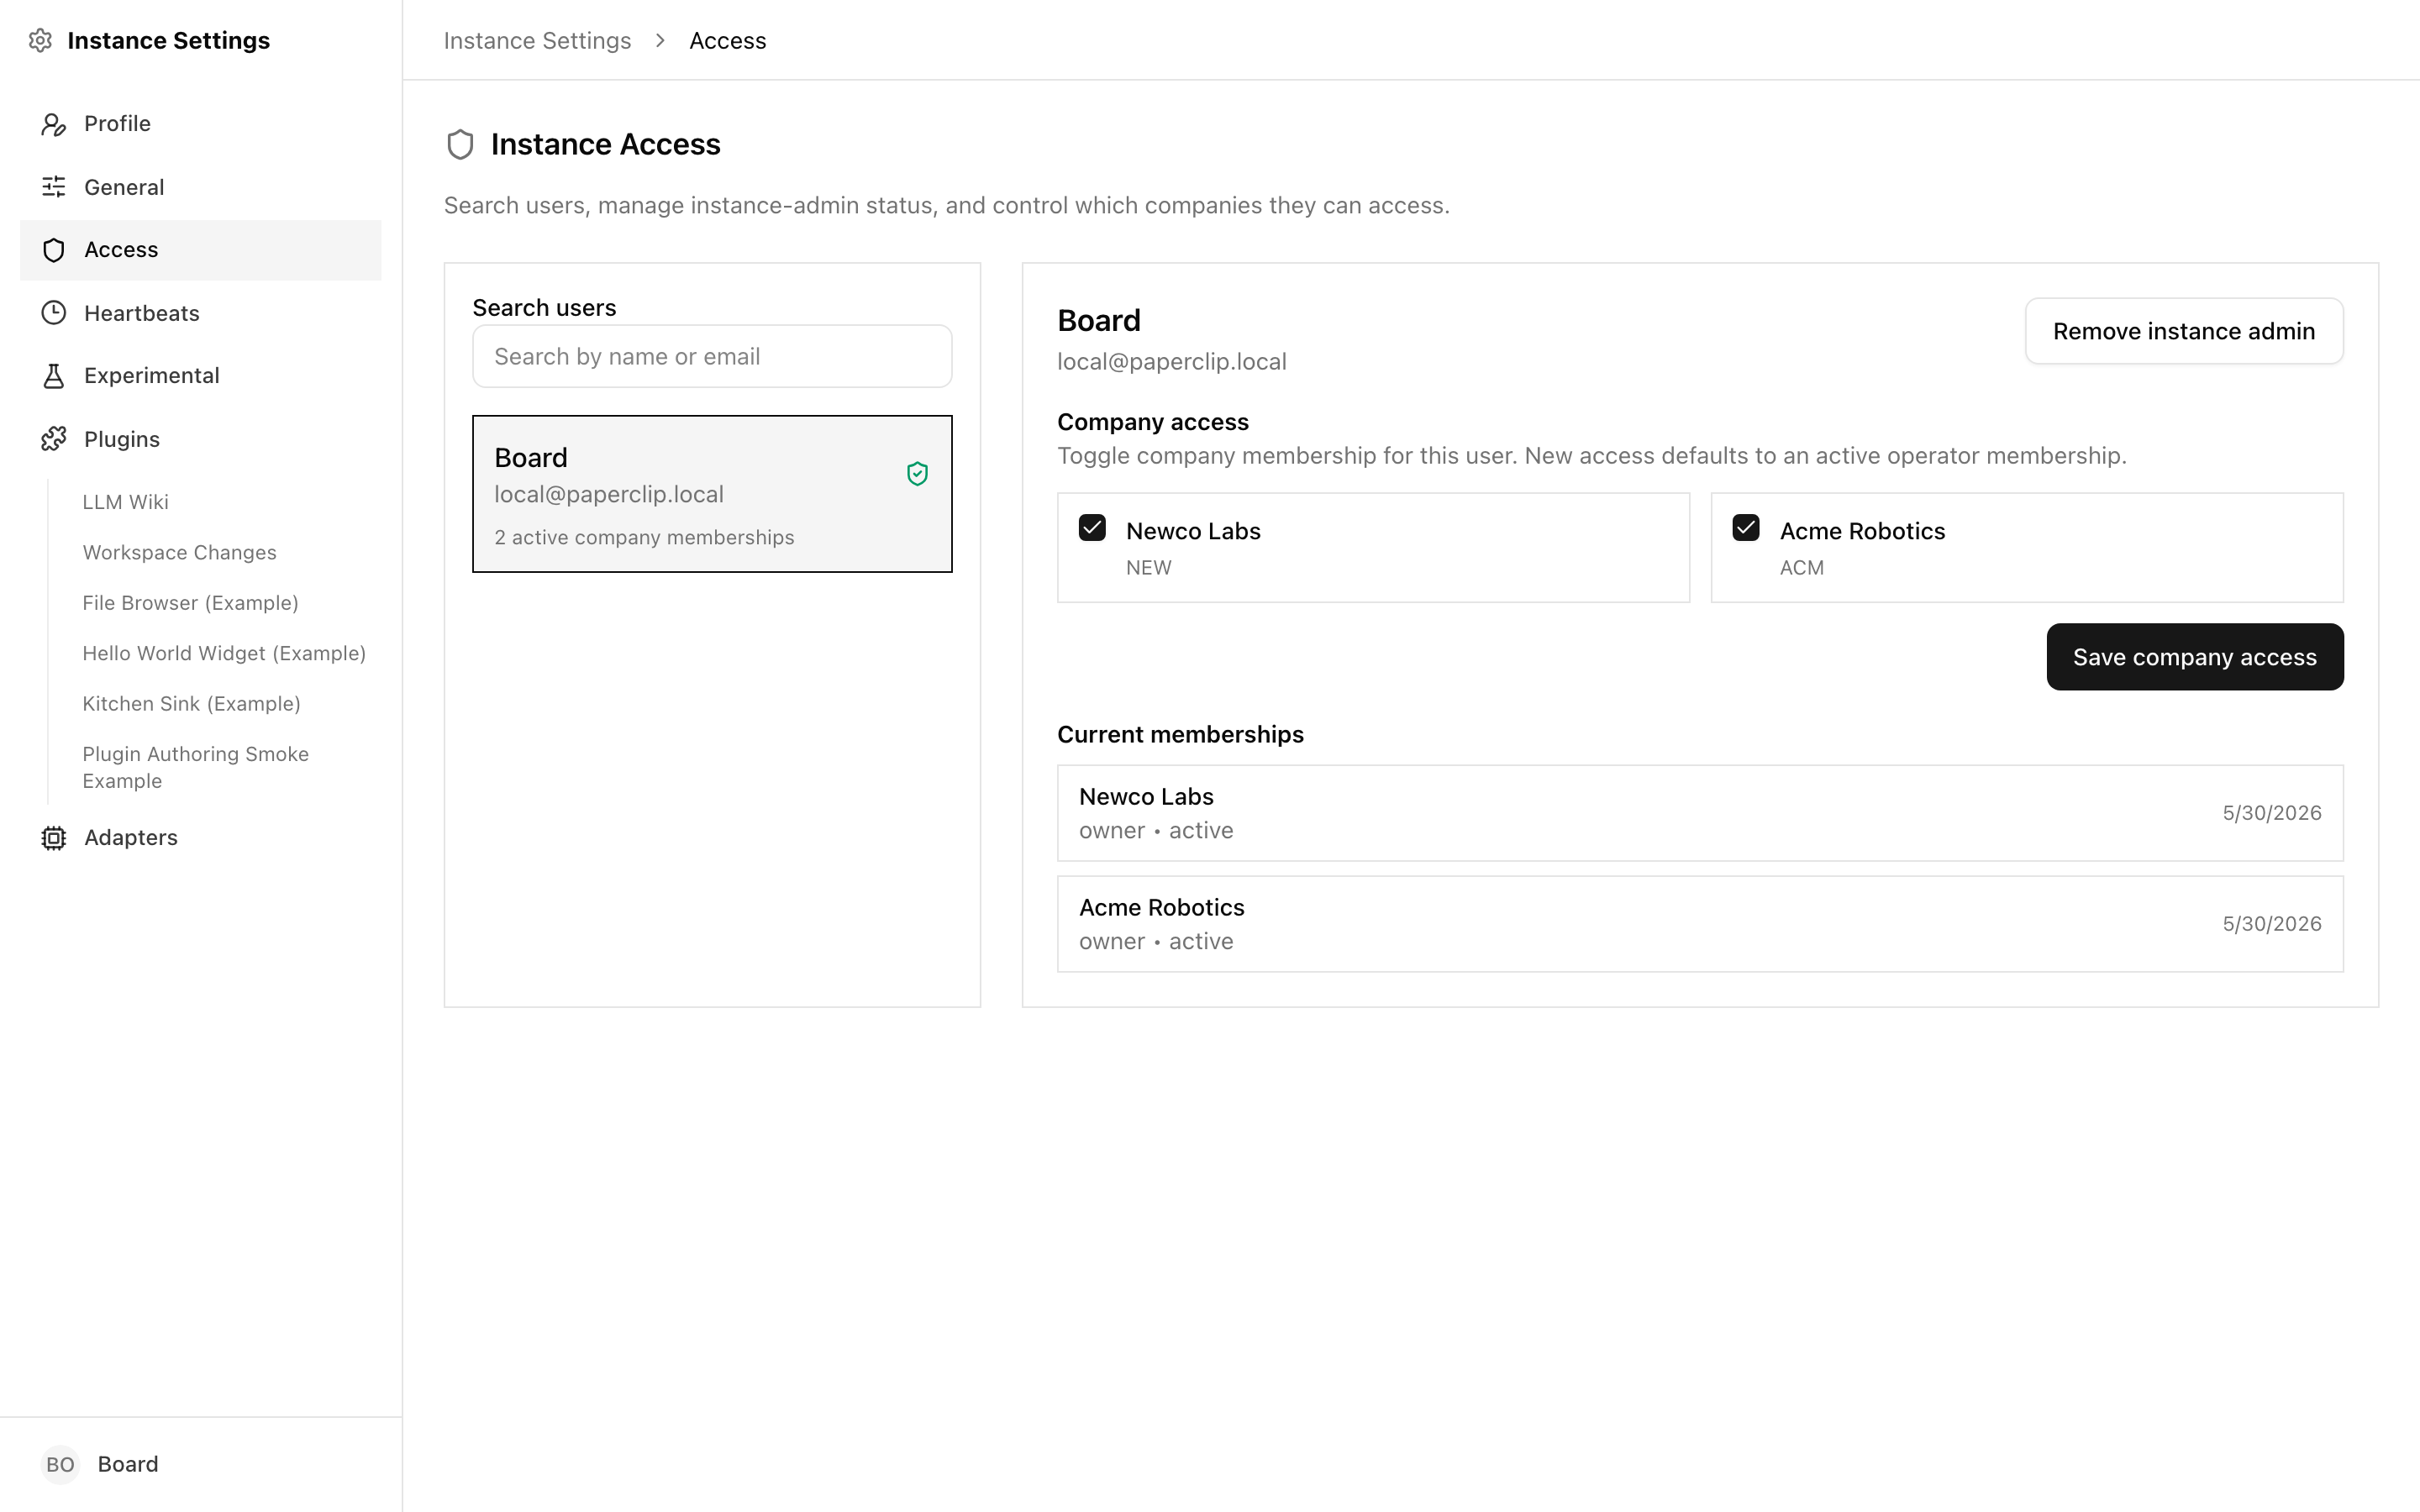
Instance Access is where you promote users to instance admin and pick which companies each user can see. This is different from the roles you grant inside a company.
Instance-level vs. company-level roles
It's worth being explicit about this because the two feel similar:
- A company membership lets a user see and act within one specific company. A user can be a member of several companies, each with its own membership role (operator, manager, etc.). This is set per-company.
- An instance admin can see and manage the instance itself — add/remove instance admins, grant users company access, and open admin-only surfaces. This is set per-user on this page.
A user can be an instance admin without being a member of every company, and a company member without being an instance admin. The two layers are independent.
Finding and inspecting a user
The left pane is a search box and a scrollable user list. Type a name or email to narrow it down. Each row shows:
- The user's name and email
- A green shield icon if they're currently an instance admin
- A count of active company memberships
Click a user to load their detail view on the right.
Promote to instance admin
In the detail view, a button toggles the user's instance-admin status: Promote to instance admin if they're not one, or Remove instance admin if they are. The change takes effect immediately. Be deliberate — instance admins can grant themselves access to any company and can demote other instance admins.
Company access
The lower half of the detail view is a grid of every company on the instance with a checkbox next to each. Tick the ones this user should be a member of, untick the ones they shouldn't, and click Save company access.
Adding access creates an active operator membership by default. If the user needs a higher role inside that company (manager, for example), switch to that company and raise their role there — this page only controls whether they have access, not what role they have.
Beneath the checkbox grid, Current memberships lists what's actually on record, with role, status, and the last update date. Treat this as the source of truth — if it doesn't match what you set in the checkboxes, re-save.
Tip: Running a VPS-hosted instance that hosts multiple companies? Use this page to onboard new people without sharing the database. Create their auth account (through your login provider), find them here, tick the companies they need, and save.
Instance: Adapters
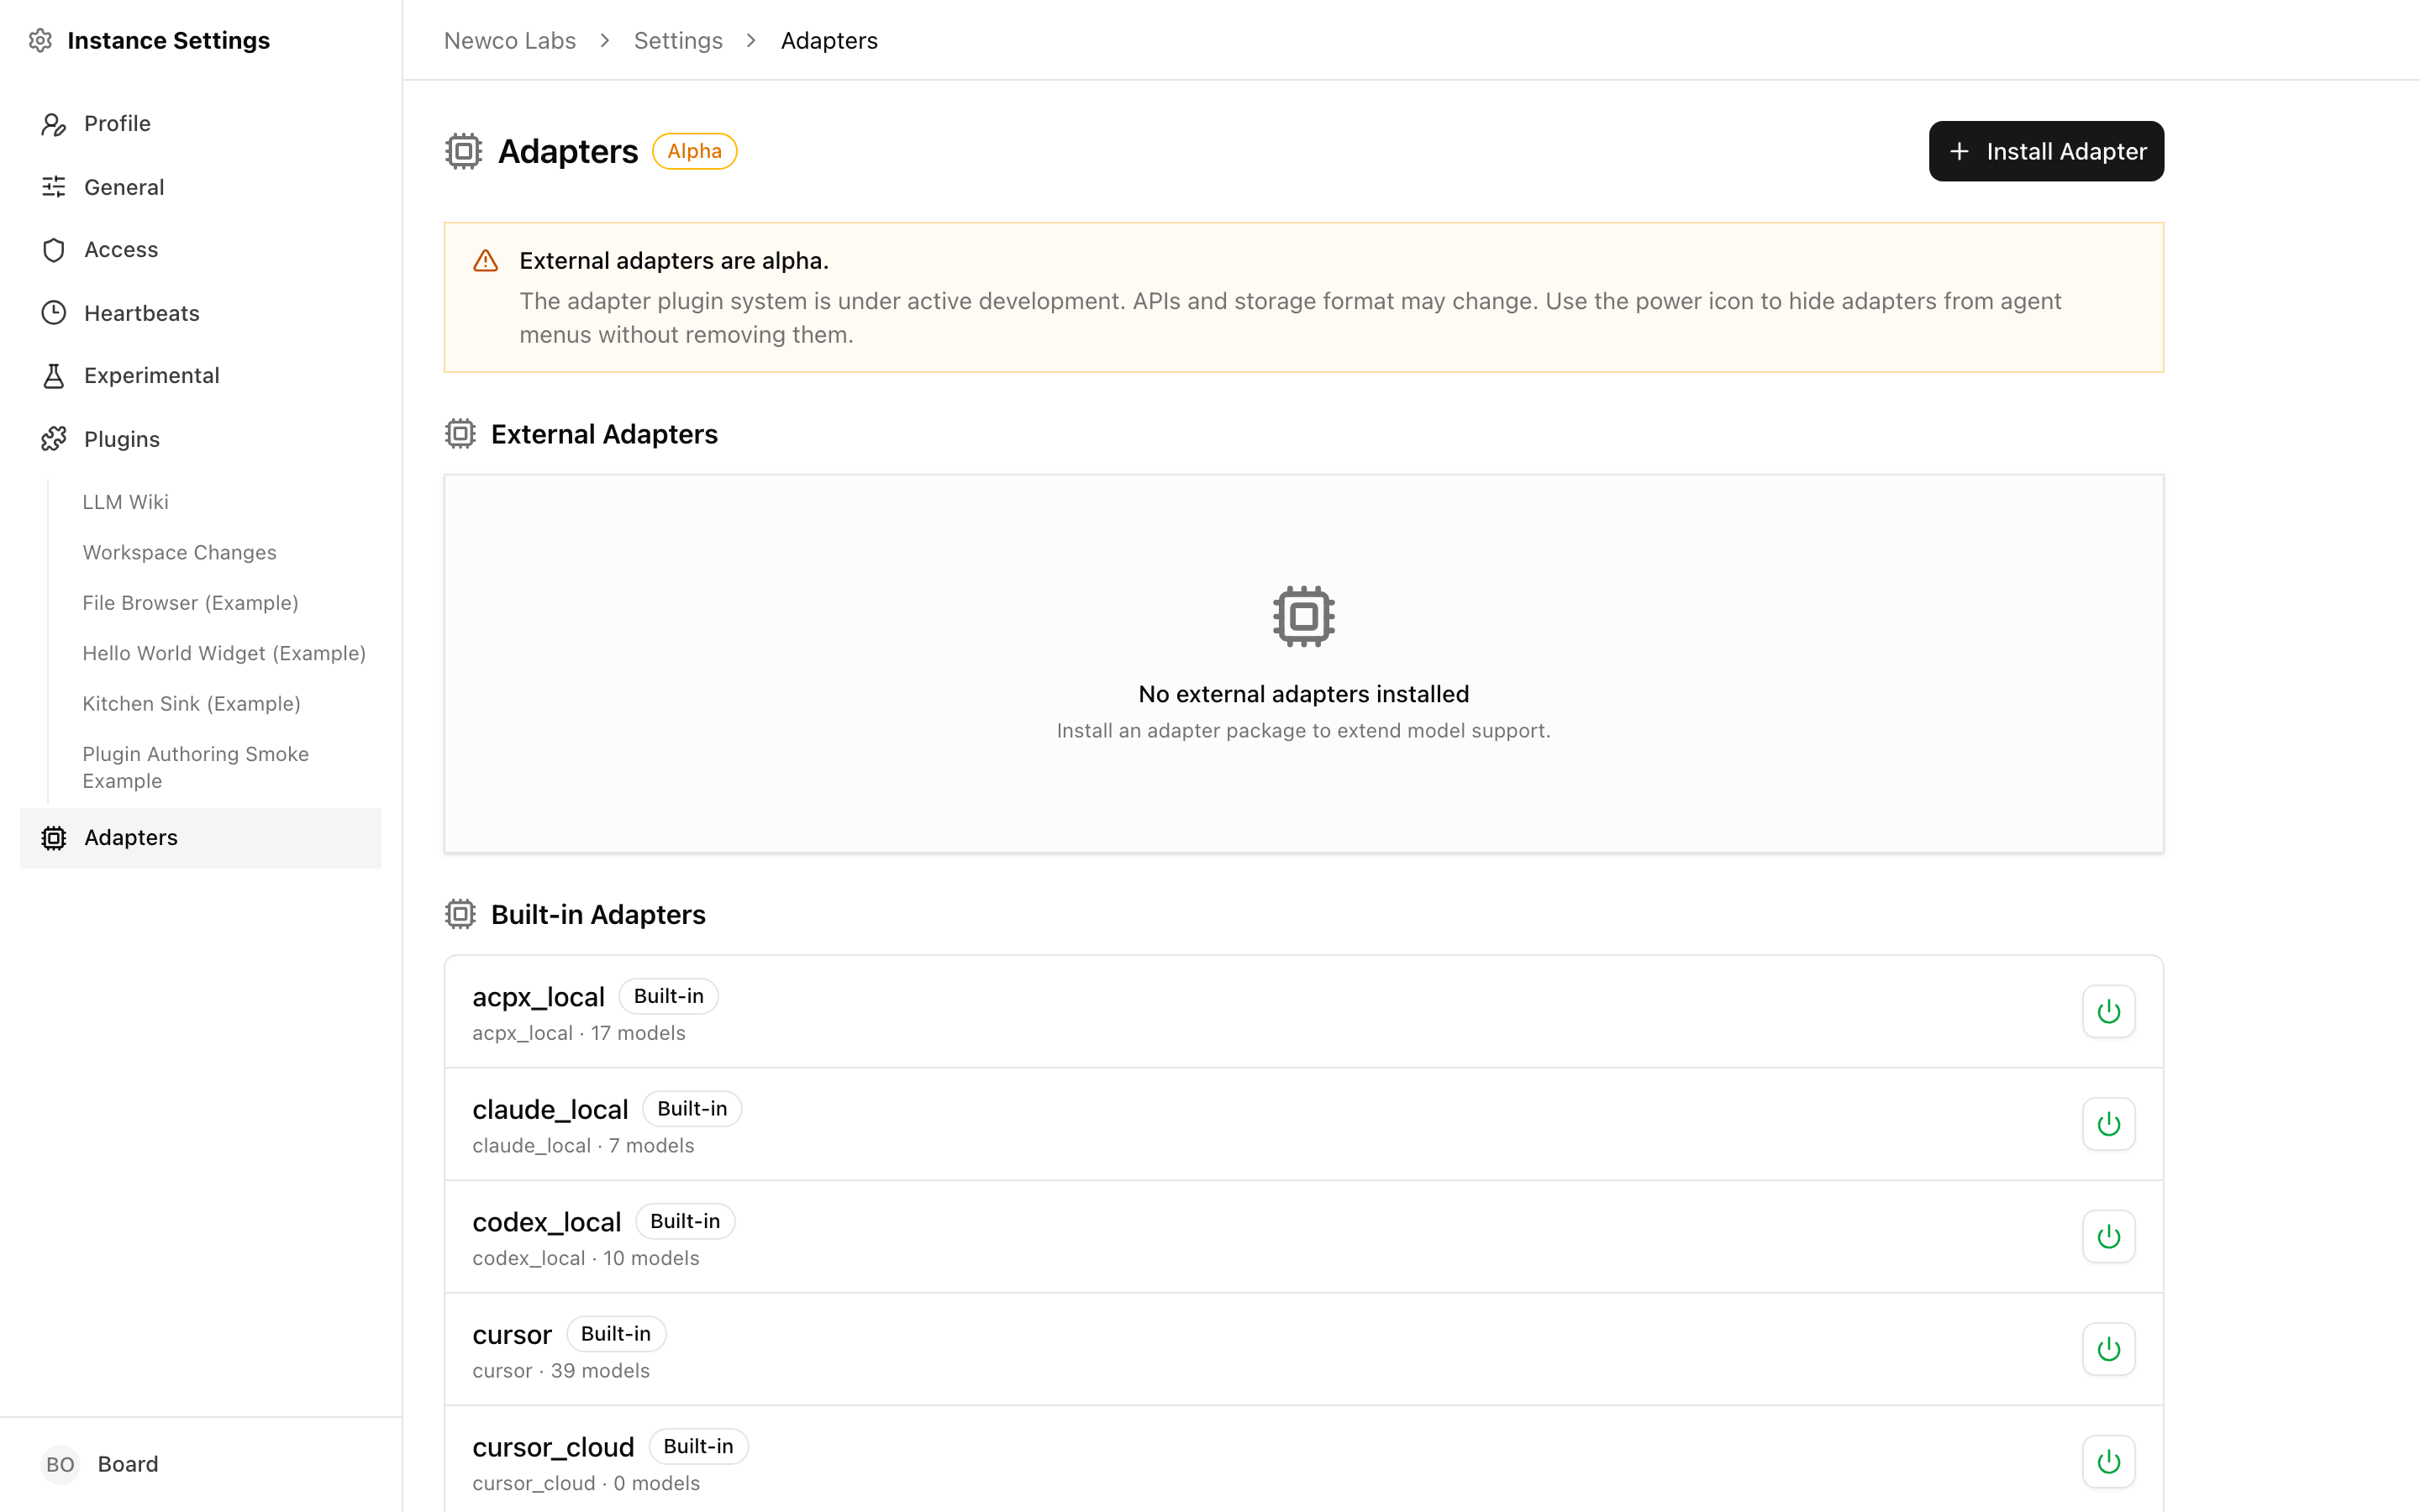
The Adapters sub-page (Instance Settings → Adapters) is the operator view of every adapter currently registered against this Paperclip install. Adapters are how Paperclip talks to an AI runtime — Claude's local CLI, Codex, OpenAI, OpenClaw, and so on — so this is the surface you use when you need to add a new runtime, hide one from agent hiring menus, or upgrade a runtime's package to a newer release.
Alpha: The external adapter system is still under active development. APIs and storage format may change between releases — reach for this page when you need it, but expect the details to keep evolving.
Installed adapters
The page has two sections, stacked top-to-bottom:
- External Adapters — anything you have added yourself, whether from an npm package or a local path. Each row shows the adapter's display label, its registered
type, the package name, the version, and how many models the adapter exposes. - Built-in Adapters — the adapters that ship inside Paperclip itself. They cannot be removed, only hidden. If an external adapter has overridden a built-in (for example, a forked version of the Claude adapter installed from npm), you also see a synthesised "built-in" row tagged Overridden by … so it is obvious which built-in has been shadowed.
A small origin icon sits next to each external adapter: a folder for adapters installed from a local path, and a package icon for adapters installed from npm. Versions appear as a mono-typed v1.2.3 badge.
Health status
The row badges are the fastest way to read adapter health:
- External / Built-in — the source of the adapter.
- v{version} — the currently loaded package version.
- Overrides built-in — this external adapter is replacing a built-in of the same
type. - Hidden from menus / Override paused — the adapter still exists but is not offered when creating or hiring agents. Use this to stage a rollout without uninstalling.
Beneath the label, a subtitle line shows type, the npm package name (when different from the type), and the model count. A zero model count usually means the adapter loaded but could not enumerate models — check the package configuration before enabling it for agents.
Enable / disable
Every row has a power icon on the right-hand side. Clicking it toggles the adapter's visibility without deleting anything:
- For regular adapters (both built-in and plain external), the power button flips the Hidden from menus state. Hidden adapters are kept registered and existing agents on that adapter continue to run, but the adapter is omitted from the adapter dropdown when creating new agents.
- For external adapters that override a built-in, the power button instead pauses or resumes the override. Pausing the override snaps every agent of that
typeback to the built-in implementation on their next run; resuming restores the external adapter.
Two more icons may appear on external rows:
- Reload (circular arrow) hot-swaps the adapter module in the running process. Useful after you have published a new version of a local-path adapter and want to pick up changes without bouncing Paperclip.
- Reinstall (download arrow) opens a confirmation dialog that checks the npm registry for the latest version, then pulls it and reinstalls the package. Existing agents will use the new version on their next run.
A Remove (trash) icon is available on external adapters only. Removing an adapter unregisters it, tears down its npm install on disk, and cannot be undone — Paperclip prompts for confirmation first.
Per-adapter config
Adapters themselves do not expose configuration on this page — they are packages, not configurable singletons. Each agent picks an adapter and then fills in the fields that adapter requires (working directory, environment variables, credentials). Those per-agent fields live on the agent's Configuration tab, not here.
What this page gives you is the ability to add, upgrade, and retire the adapter packages that populate the agent adapter menu. To install a new external adapter, click Install Adapter in the top-right of the page. A dialog appears with two source modes:
- npm package — enter the package name (for example
my-paperclip-adapter) and optionally a version. Paperclip installs the package from npm and registers it. - Local path — paste a Linux, WSL, or Windows path to a checked-out adapter package. Paperclip auto-converts Windows paths and installs the adapter from disk. Local-path adapters are the fastest way to iterate on a new adapter before publishing.
In both cases the adapter package must export createServerAdapter() — the dialog reminds you of this contract.
For the full catalog of adapters Paperclip supports out of the box, along with the per-agent fields each one expects, see the reference docs: Adapters overview.
Instance: Scheduler Heartbeats
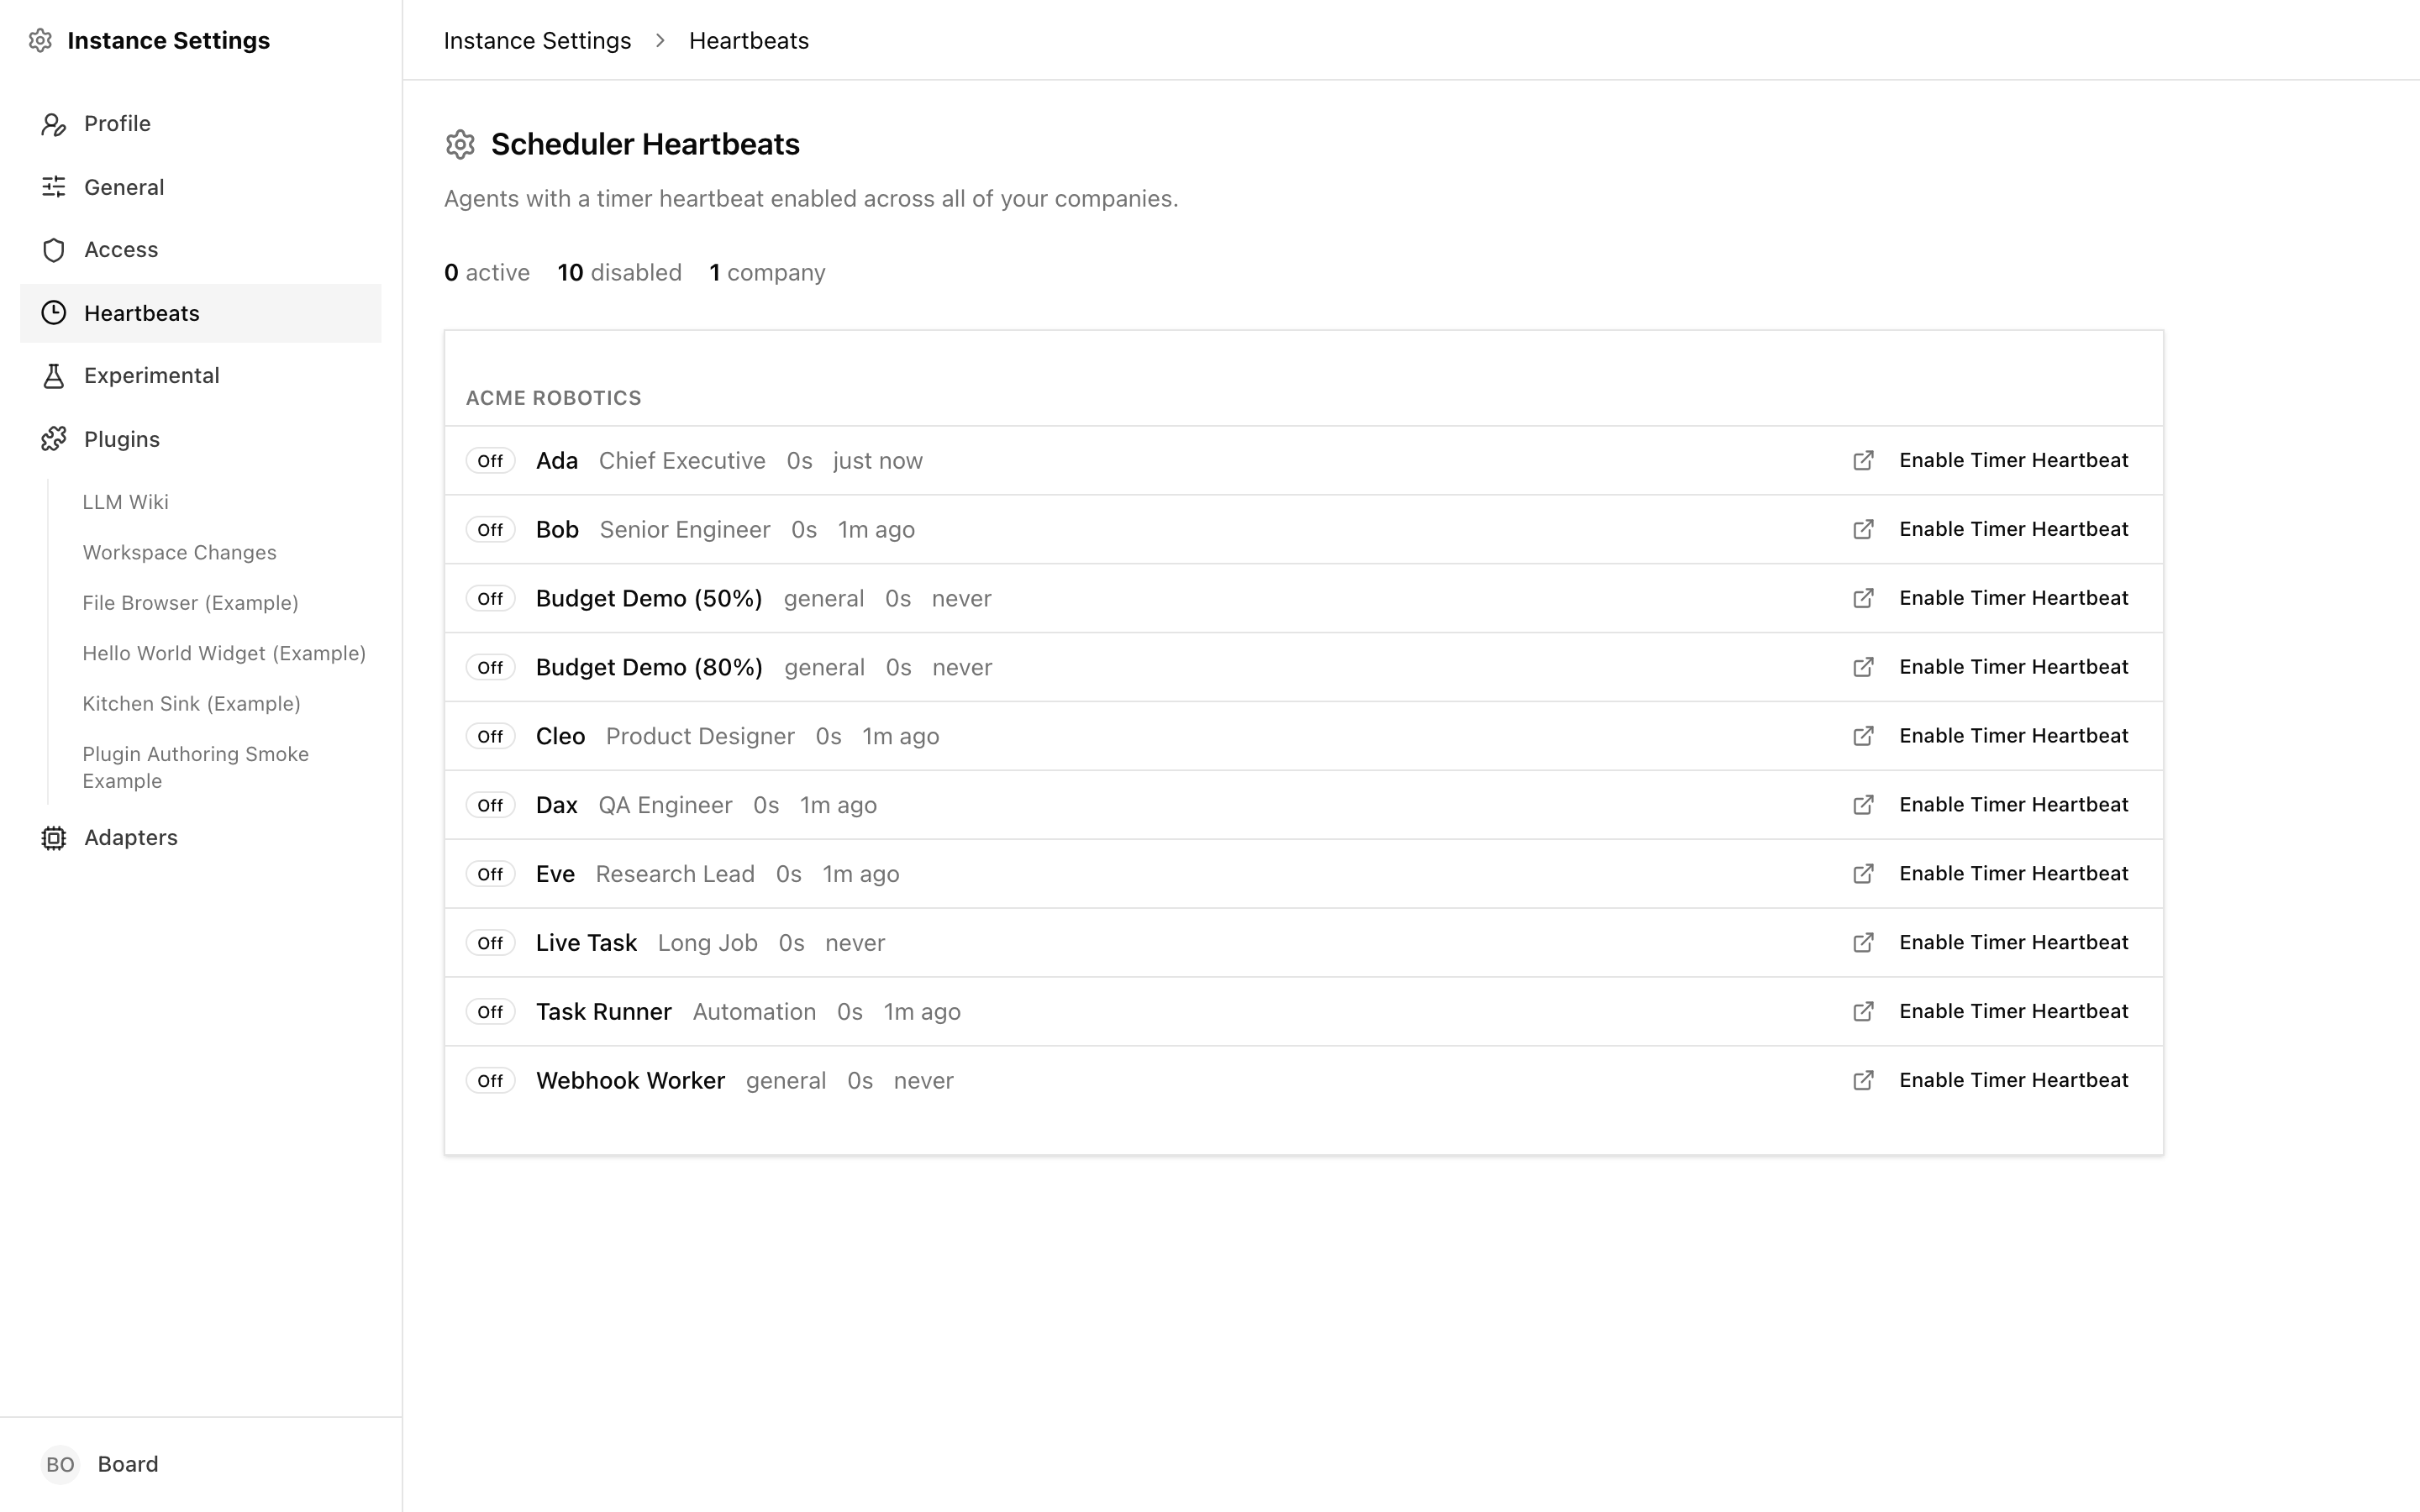
The Scheduler Heartbeats page is a cross-company view of every agent on the instance that has a timer heartbeat enabled.
What the scheduler does
Paperclip's scheduler is the component that wakes up timer-driven agents on an interval. It reads each agent's runtimeConfig.heartbeat block, notices when the next tick is due, and fires the run. Event-driven wakes (assignments, comments, routines) don't go through this surface at all — they happen regardless of the timer state.
For a deeper explanation of when to use timer heartbeats vs. event-driven wakes, read Heartbeats & Routines. In short: timer heartbeats should be the exception, not the rule.
What this page shows
At the top of the page, a summary line reports:
- How many timer heartbeats are active (enabled and the scheduler considers them live)
- How many are disabled
- How many companies the list spans
Below that, agents are grouped by company. Each row shows:
- An On/Off badge for whether the scheduler sees the heartbeat as active
- The agent's name (links to the full agent config)
- The agent's title or role
- The configured interval in seconds
- When the last heartbeat ran, as a relative time ("2m ago", "never")
- A link icon to jump to the agent config, and a button to Enable Timer Heartbeat or Disable Timer Heartbeat inline
The list auto-refreshes every 15 seconds so you can watch an enable/disable take effect.
When to tune it
Reach for this page when:
- You suspect an agent is burning budget on idle wakeups. Find it in the list, check the interval, and either raise the interval on the agent config page or disable the heartbeat.
- You've just imported or cloned an instance and want to take stock of every timer-driven agent in one place before turning any of them loose.
- You need a quick emergency shut-off. The Disable All button at the top right of the summary line disables the timer heartbeat on every currently-enabled agent in one operation. It prompts for confirmation first. Event-driven wakes still work afterwards — this only stops the tickers.
Safe defaults
- Most agents should have timer heartbeats off. They stay active on the dashboard and wake on assignments, comments, and routines. This is Paperclip's default for new agents.
- When a timer is truly needed (polling an external system with no webhook, for example), push the interval as long as you can stand. Minutes or hours, not seconds.
- After an import or major config change, check this page — other instances' timer settings will come with them, and you may want to disable the ones you don't recognize before the scheduler starts firing them.
Instance: Experimental
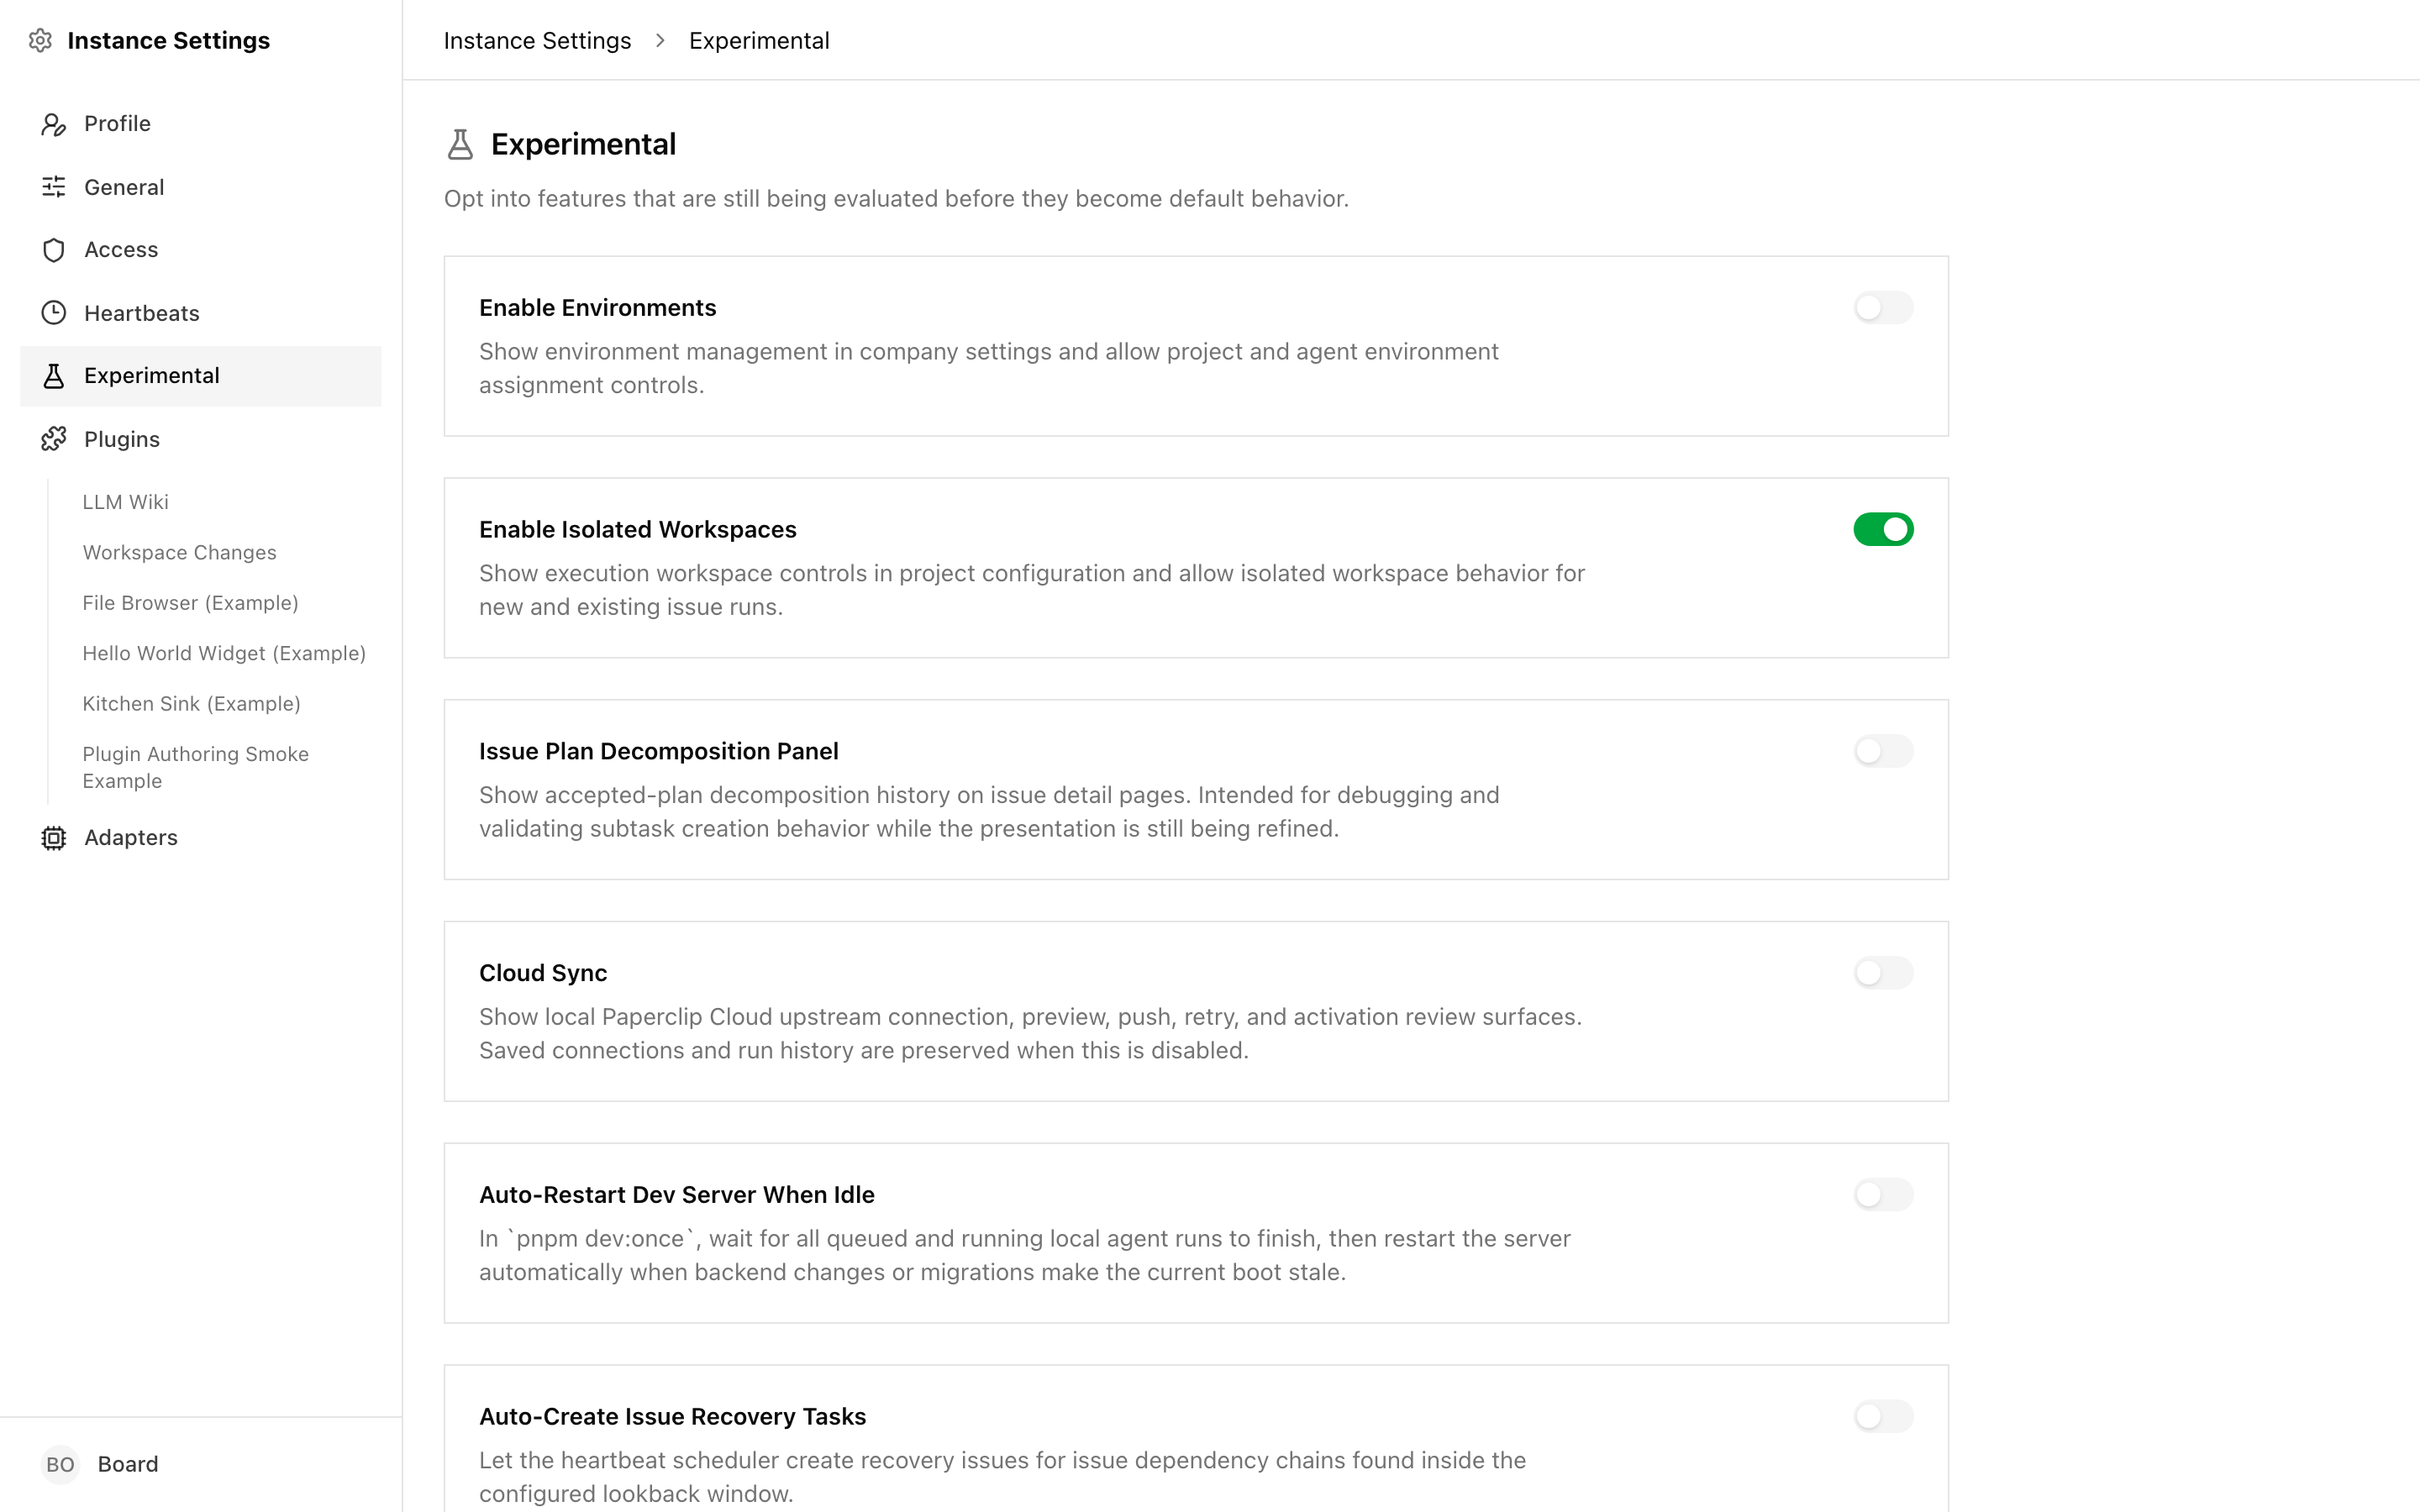
Experimental flags opt the instance into features that aren't yet defaults. They're gated here because they may change behaviour, performance, or migrations before they graduate.
What "experimental" means here
An experimental flag in Paperclip is a feature that:
- Has shipped and works,
- Is being evaluated against real usage before it becomes the default, and
- May be renamed, reworked, or promoted to a core setting in a future release.
Turning one on is not dangerous in the "this will break your data" sense — but it does mean you're opting into behavior that may change how agents run or how the backend restarts. Flip flags when you have a reason to, not for curiosity, and expect to re-read the release notes if you upgrade.
The available flags
- Enable Isolated Workspaces — shows the execution-workspace controls in project configuration and allows isolated workspace behavior for new and existing issue runs. If you're not using isolated workspaces, leave this off; turning it on exposes extra UI you don't need.
- Auto-Restart Dev Server When Idle — only relevant under
pnpm dev:once. When the backend detects a stale boot (code changes, new migrations), it waits for queued and running local agent runs to finish and then restarts the dev server automatically. Useful during active development on Paperclip itself, not intended for production.
Both toggles take effect immediately on save. If one misbehaves, flip it back off — no migration is required.
Where to go next
- Heartbeats & Routines — the full picture of timer vs. event-driven wakes, and how to configure individual agents.
- Environment Variables — the deployment-level settings that the General page reports on (auth mode, bootstrap state, exposure).